An Incremental Load Development Method
feature By: Rick Moritz | August, 21
Audette developed a method to determine the “sweet spot” for a given rifle by varying the powder charge. He referred to this method as the Incremental Load Development Method, (ILDM). He would typically load a series of 20 different powder charges while using the same bullet, primer, case brand, and overall length. The powder charge increment was small (remember this was smokeless powder), 0.2 or 0.3 grains. He was careful not to exceed published maximums and watched for signs of pressure. Firing the shots on target in sequence, he would carefully plot the bullet holes and upon later analysis, he would look for the “sweet spots.” One would expect the shots to print progressively higher on the target as the velocity increased due to the increasing powder charge. Audette observed that with an increase in the powder charge there was not always a corresponding change in elevation. The impacts did climb up the target but Audette observed there were areas where sequential shots would cluster. These clusters are the “sweet spots.”
Although originally described by Audette as the “ILDM,” this method has also been described as a “ladder test.” My understanding of a ladder test involves five shots at each charge weight, which are shot as a group. The group with the smallest vertical dispersion is selected as the desired charge weight. ILDM varies as there is one shot for each charge weight.
After reading about the ILDM method, I attempted to follow the methodology for Black Powder Cartridge Rifles (BPCR). Some of my first tests were less than impressive. But, persevering and believing in the method, I eventually had success. The beauty of the method is that it is a systematic process to develop accurate ammunition. It is far easier and faster than selecting some charge weights at random and shooting groups. It also requires far fewer shots and time.
Using the method has greatly reduced my group sizes and reduced my vertical dispersion. I do not claim to have developed or invented anything new. I have applied a methodology to black-powder cartridges that have been known for decades. I have used the ILDM method for the last 20 years and start all my load development in this manner with any new lot of black powder, new bullet, or new rifle. By firing an initial 15 shots and following with 10-shot test groups, (using the sweet spot charge weight), a shooter can determine very quickly if the rifle or chosen components are going to perform.
Background
If we fire a series of shots each with increasing velocity from a theoretical rifle, each shot will impact higher on the target in a very uniform and even manner.
However, due to the energy imparted to the barrel from the exploding powder and subsequent acceleration of the bullet down the barrel, our barrel vibrates. This vibration occurs while the bullet is still in the barrel. When the barrel vibration is paired with the higher velocity of each sequential shot the bullets’ impacts on the target are no longer uniform. Initial observations of the target using this method are randomly scattered shots. But with careful analysis, patterns within the shots emerge.
We are searching for a cluster of shots where our elevation impact is very close to the same for sequential shots. In theory, we are determining the point where the muzzle of the barrel, due to vibration, is at the top or bottom of its travel. When the muzzle reaches either end of travel, the muzzle must pause momentarily before reversing direction. If our bullets exit during this pause the vertical dispersion will be minimized and greatly reduce high and low shots. According to Vaughn, “the horizontal motion of the muzzle is about 1/3 of that in the vertical plane.”1 The vast majority of the barrel movement is in the vertical direction.
By graphing the results, it is possible to see the point where the muzzle of the barrel has stopped and created a sweet spot. Equally as important in my opinion is that I can see the “sour spots.” Large vertical dispersion between subsequent shots represents powder charge weights that should be avoided. This will become clearer as the ILDM is described.
Different lots of black powder will change the powder charge range associated with the “sweet spots.” Specifically, I find that new lots of powder will have a slightly different density, which will change the velocity for a given charge weight. With a new lot of powder, handloaders will find that it is easy enough to run a quick ILDM test to identify the new “sweet spots.”
ILDM Process-Test Preparation
Heavy barrels are not as prone to vibration due to their inherent stiffness. Therefore, it is easier to tune a short, large diameter barrel than a long, slender barrel. However, slender barrels benefit the most from the application of the ILDM.
I will present two ILDM tests that I had in my files. These are not special tests or the very best tests. They are typical tests.
I have used the .38-50 Remington Hepburn long enough that, outside of changing the powder charge, all other components are held constant. All presented tests are with W-W brass, Federal Large Pistol primers, and an expander diameter equal to a bullet diameter, poly wad, and an overall length that allows for seating .030 inches into the lands. I know many shooters that have great success loading the bullet short of the lands. It also works, I just don’t load that way.
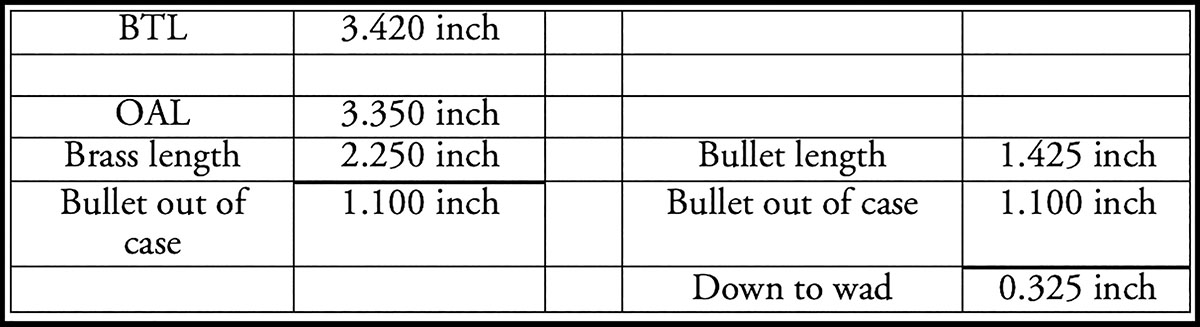
For the selected bullet, I like to determine my “Breech to Lands” (BTL) measurement as a first step in the ILDM process. There are several methods to complete this task. I slide a wooden dowel down my rifle barrel until it contacts the closed breech, I then make a fine pencil mark on the dowel where it meets the barrel crown. I then slide an unlubed bullet, (bullet only), into the rifle and hold it in place against the rifling with a No. 2 pencil while sliding the dowel into contact with the bullet nose, again making a mark on the dowel at the crown. The distance between the marks is the BTL distance for the selected bullet. I add .030 inches to the amount to obtain the overall loaded length. Assuming my BTL is 3.470 inches, I complete the following calculation to determine the distance from the case mouth to the over powder wad, (labeled as “down-to-wad” in the table). This is important, as all our powder charges will be compressed to the same amount below the mouth of the cartridge case.
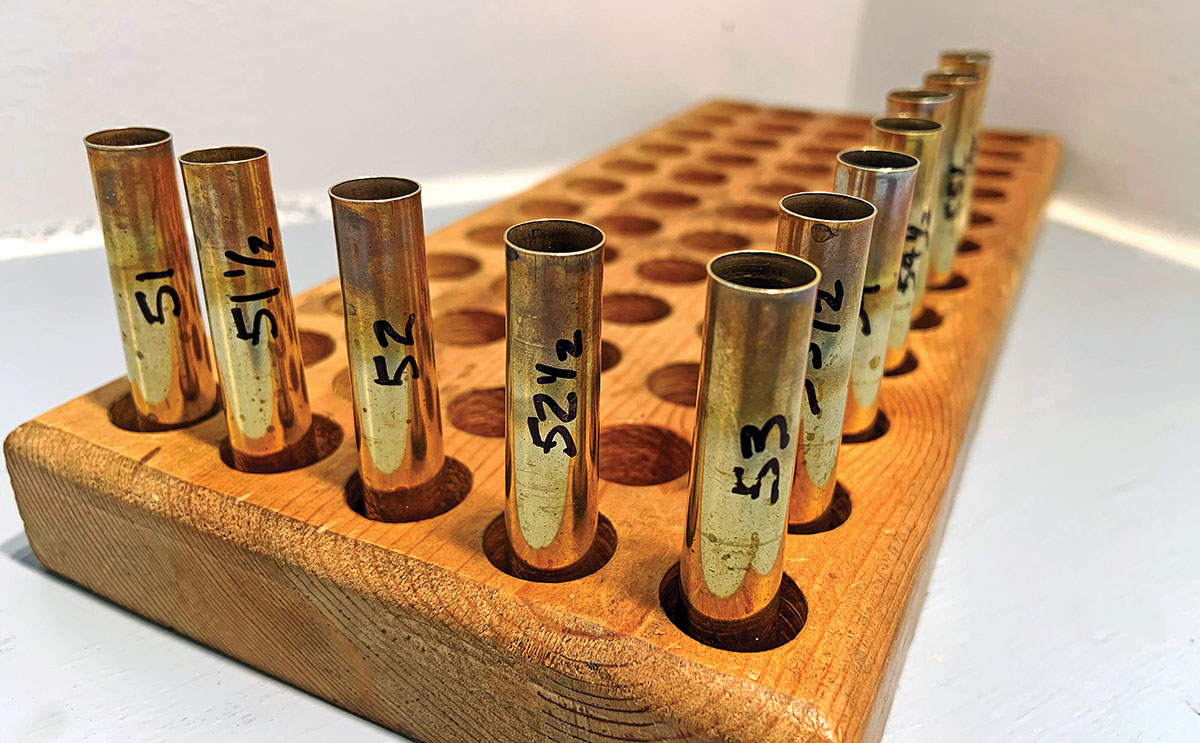
I load 10 to 14 different powder charges for the test, starting with a charge that has zero compression, in this case, .325 inches below the case mouth, and increase the charges by an increment of a half grain. It is necessary to try a few powder charges to determine the correct amount of powder to match the down-to-wad dimension. The first example test to be presented started at 51 grains of 2fg Swiss with a total of 13 cartridges loaded. The cartridges were loaded with 51, 51.5, 52, 52.5, 53, 53.5, etc. until the thirteenth cartridge was loaded with 57 grains. I have found that each grain of powder, in the powder ranges I use, increases the velocity by eight to 10 feet per second. I settled on the half grain increment, as I felt it gave more than adequate granularity for a black powder ILDM test.
Before loading the cases, each case is labeled with the desired powder charge and placed into a loading block. Handloaders should also include two or three extra cartridges at the starting charge, in this example 51 grains. These will be used to foul the barrel and get centered on the target.
All powder charges should be compressed to the same depth and have the same overall loaded length. When completing the test, I suggest taking three Schuetzen targets along with some pens and all the normal shooting gear. Handloaders should shoot the test from a position that provides the greatest accuracy. I complete my tests from prone with shooting sticks as it mimics match condition. If shooting from the bench, I suggest resting the barrel in the same place as your normal prone position.
Pick a fairly calm day to run the test. Many times, I have carried my ILDM test ammunition home unfired as the conditions were too poor to run a good test. Initially, handloaders may want to consider duplicating the test by loading two of each charge and running the test twice. Run each test on a clean target otherwise tracking all the bullet holes becomes a bit overwhelming. If there is a problem with the first test, doing this provides for a backup test.
Performing the Test
With my first ILDM tests, I found that I needed a spotter to help track the shots. I was able to convince my wife to help and she did an excellent job. After gaining experience with the method, I was able to track and plot the bullet holes myself using a ground scope.
Post two of the Schuetzen targets at 200 yards and give the third one to the spotter along with a pen. Take along some extra ammunition and fire a few shots to settle in and make sure to have the proper elevation and windage.
Firing
Once centered on the lower portion of the bull, move to the record target and fire each shot in sequence while the spotter carefully plots the impact and labels each shot with the appropriate powder charge. Do not be concerned about windage drift. We are looking for vertical dispersion. The many rings on the Schuetzen target allow for precisely locating each shot. This will become important when it comes time to label the actual bullet holes with the charge weight. If the spotter is unable to locate one of the shots in the firing sequence, it can normally be sorted out when you pull the target. Usually, these are doubles that are hard to detect from 200 yards. If you lose two shots, the test is over. The basis of the test is to be able to measure vertical dispersion. We need to know which charge weight corresponds to each bullet hole for the conclusions to be valid.
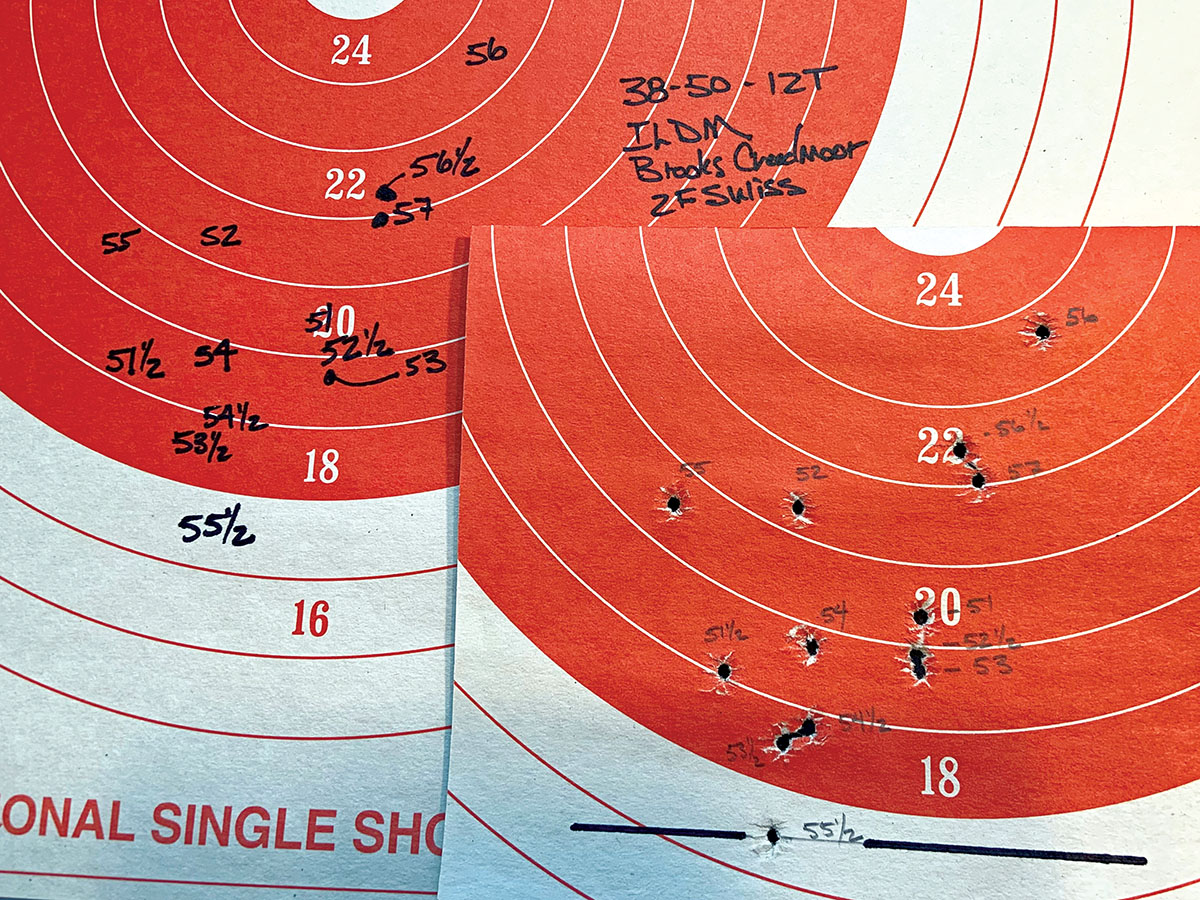
The first test is a CPA 44½ Stevens with a 30-inch, 3½ weight, octagon Green Mountain barrel with a 6x MVA scope and DZ mounts. The charge weight of 2Fg Swiss was from 51 to 57 grains in half grain increments, for a total of 13 shots, plus two fouler shots on the sighter target.
Graphing
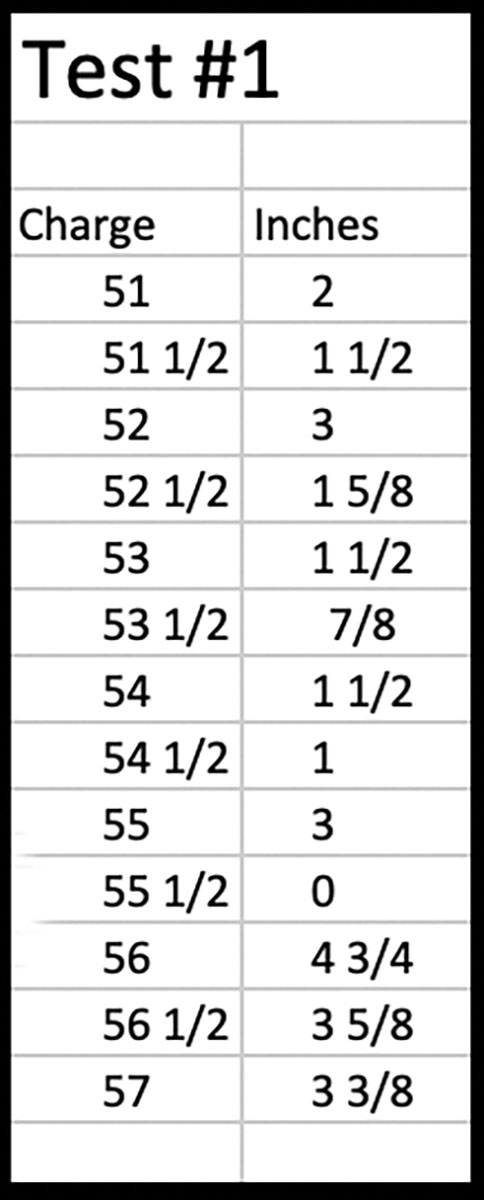
Draw a horizontal line across the target through the lowest shot on the target and note the horizontal line through the bullet hole with the 55½-grain charge weight. This corresponds to zero inches. From this line, measure vertically to each bullet hole and generate Table I as follows.
We now need to generate a graph. The y-axis (vertical) should be in inches and represent the distance above the zero line for each shot. The x-axis (horizontal) will be our charge weight. I prefer to use Microsoft Excel to complete the plot but this can easily be done by hand. All you need is some graph paper, a straight edge, and a pencil. Once the graphs have been generated, we can complete an analysis of the results.
Analysis
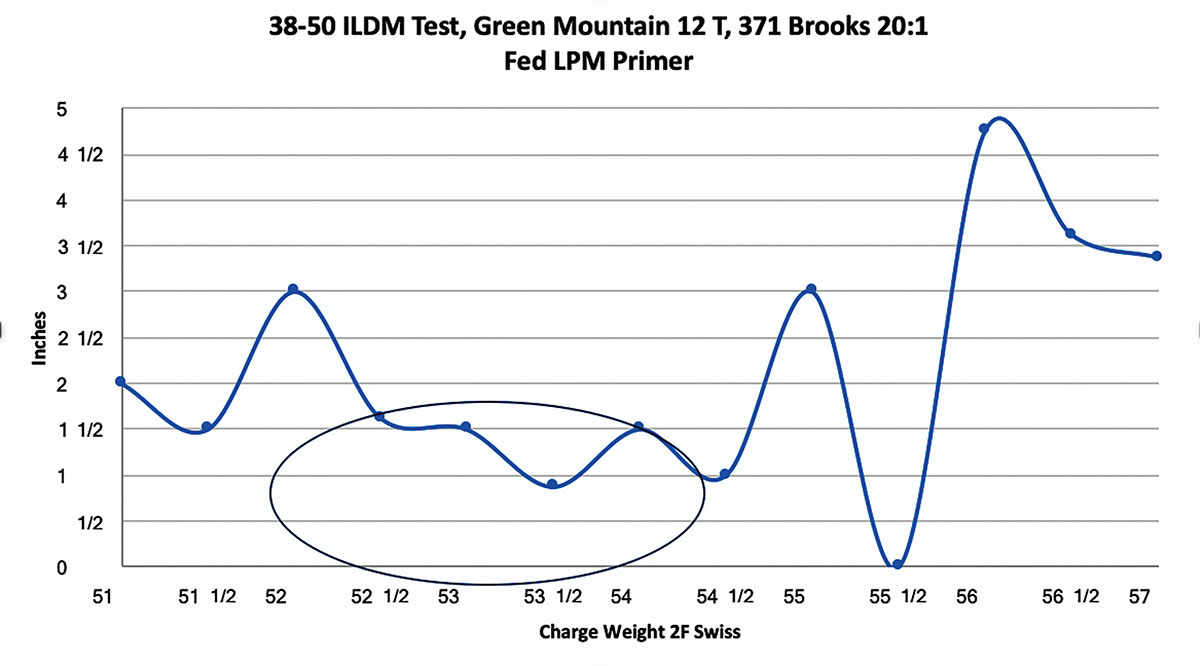
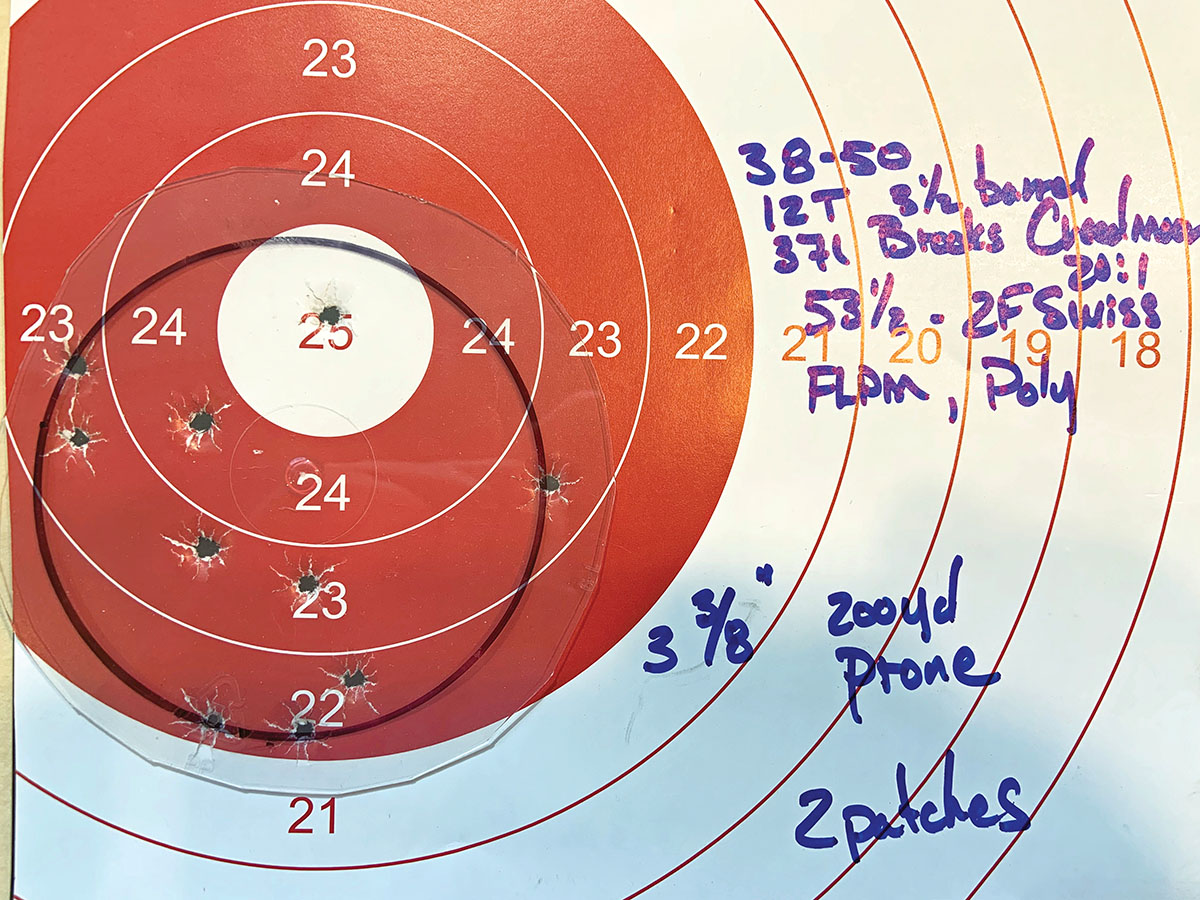
Based on the results, I selected a charge weight of 53½ grains. Ten cartridges, with a few sighting shots, were loaded at 53½ grains and I returned to the range to fire a 10-shot group at 200 yards. This distance and 10 shots have become my standard for load comparison. Virtually everyone has access to a 200-yard range and a 10-shot string is pretty standard for most matches. What sort of accuracy expectations should we have based upon our 10-shot group? Many shooters use coins as a quick gauge for group size. I do not have any coins large enough to cover a 10-shot 200-yard group. For 200-yard tests, I use a 5-ounce tuna can as my standard. The cans are in my reloading room for lead slag when casting. The cans are 3.375 inches in diameter and represent 1.6 MOA at 200 yards. If the 10-shot group will fall into a tuna can, I feel the load is very good. It is a quick and easy gauge for checking group size.
I feel that given decent shooting conditions, the developed load should meet this 1.6 MOA standard, 10 shots at 200 yards, on demand.
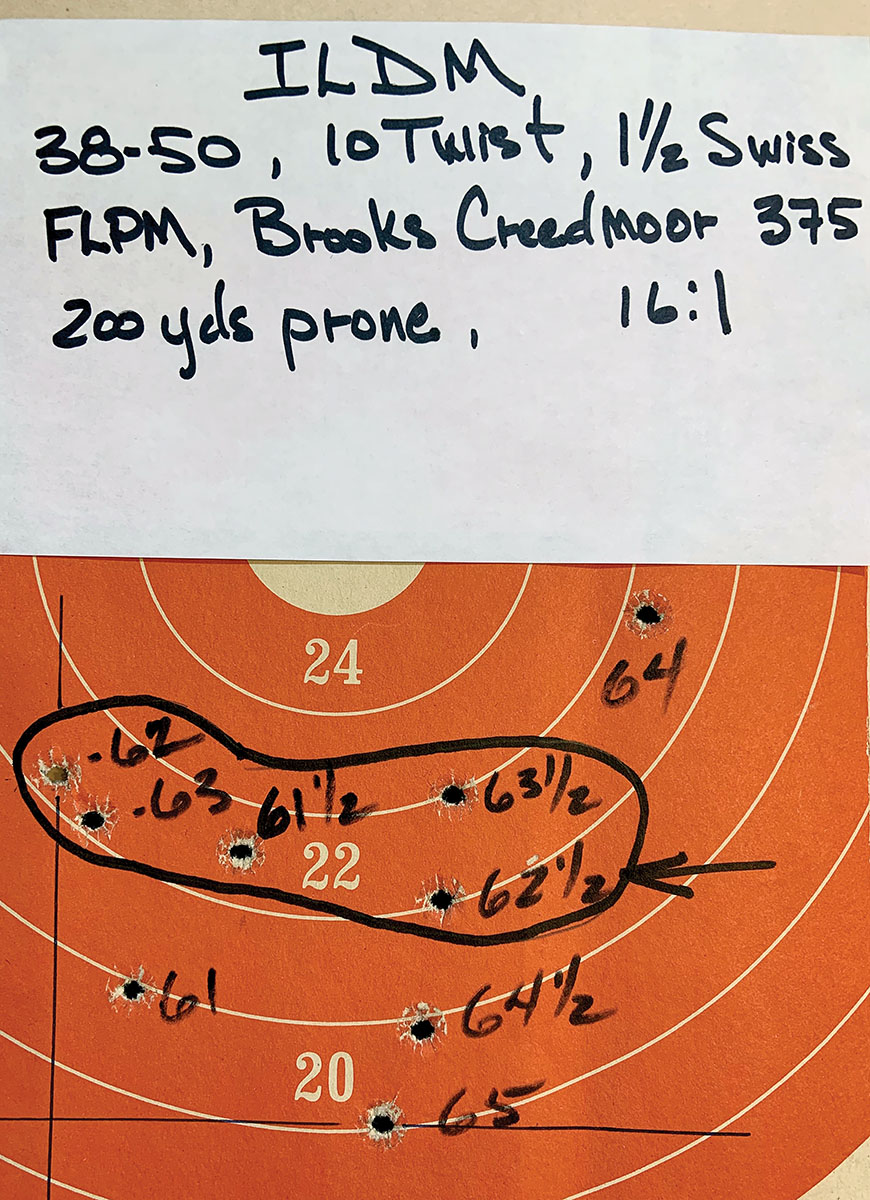
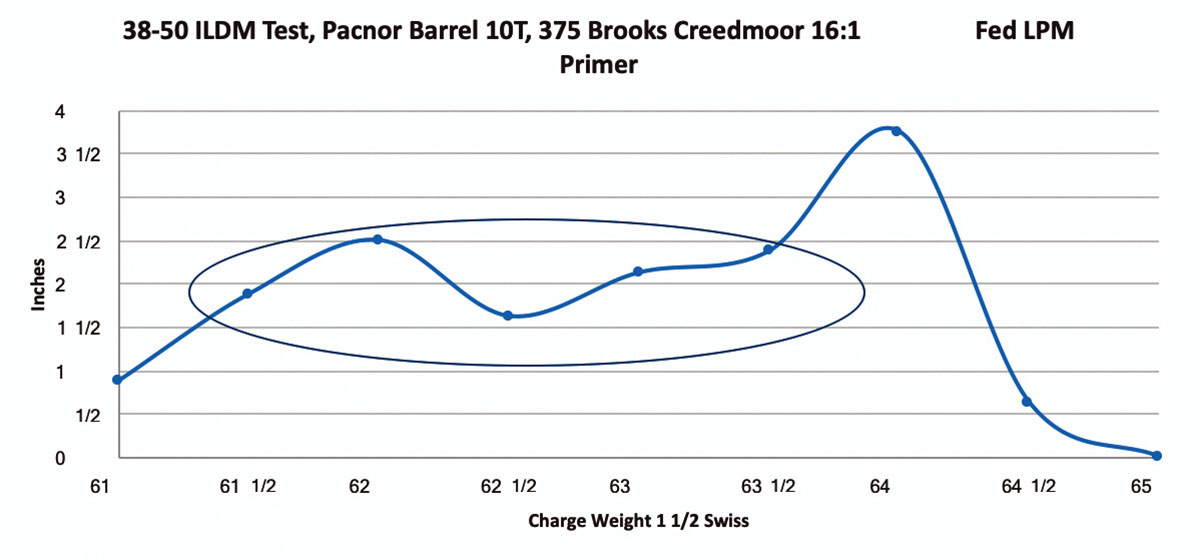
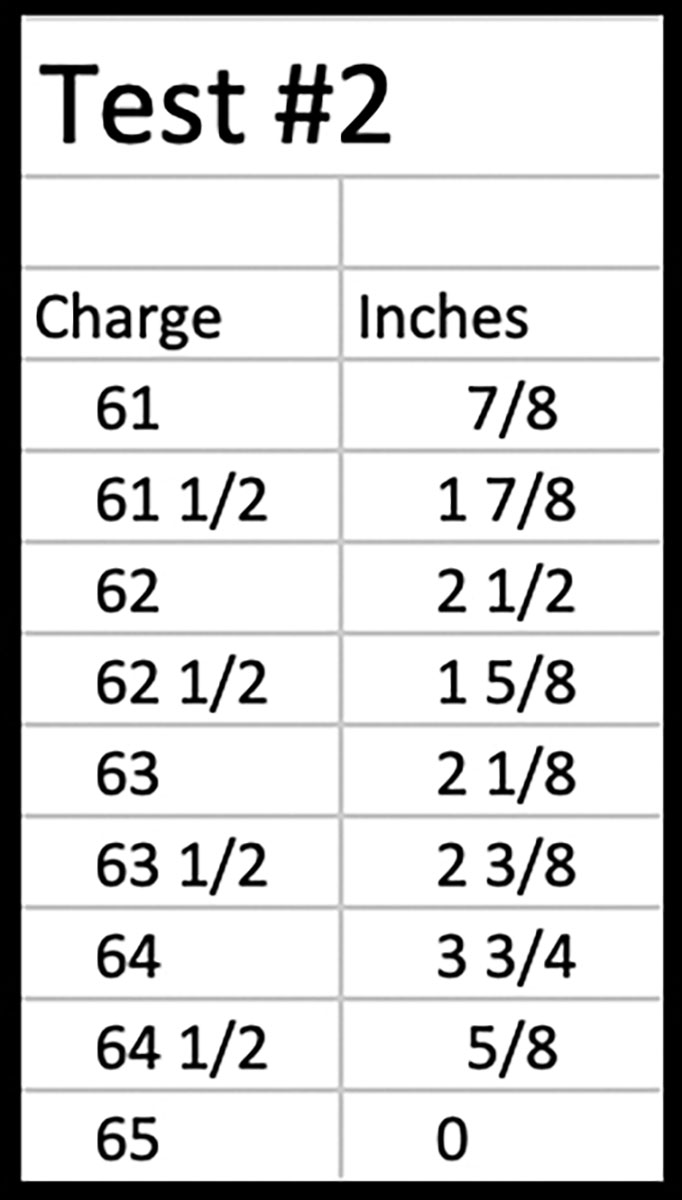
The second test is another .38-50 but with a 10-twist barrel. This is a Pac-Nor match barrel with 5 grooves. The late Dan Theodore had six of these stainless-steel barrels made as a “group-buy.” The barrels were made with a custom button, which he always referenced as sinusoidal rifling. The bore has an extremely smooth finish and is super easy to clean. Visually, the trailing edge of the rifling has a very distinctive slope. To my untrained eye, it looks like a cross between 5R and Ratchet rifling.
The barrel has a slightly larger bore, which allows for a longer overall length with the 375-grain Brooks’ bullet. As a result, the charge weights were from 61 to 65 grains of 1½ Swiss, a total of nine different charges. This is on the very upper end of charge weights for the .38-50. This rifle has a fairly stiff barrel, 28 inches long 1.2 inches in diameter round barrel with no taper. This barrel is also on a CPA 44½ Stevens rifle.
I have presented the test target and graph. It is readily apparent there is a nice cluster of shots from 61½ to 63½ grains, (the shots are outlined). This cluster is approximately .875 inches tall. Notice the jump in the vertical direction at 64 grains and then they dive down to the 65-grain charge, see test target No. 2. This, again, is one of those charge areas to avoid.
Graphing the results, as in the first test, it shows a fairly flat spot from 61½ to 63½ grains. Again, I would avoid 64 to 65 grains due to the large vertical. I am confident that if the test were extended beyond 65 grains, another sweet spot would form. That is a significant amount of powder for a .38 caliber and fouling could become an issue.
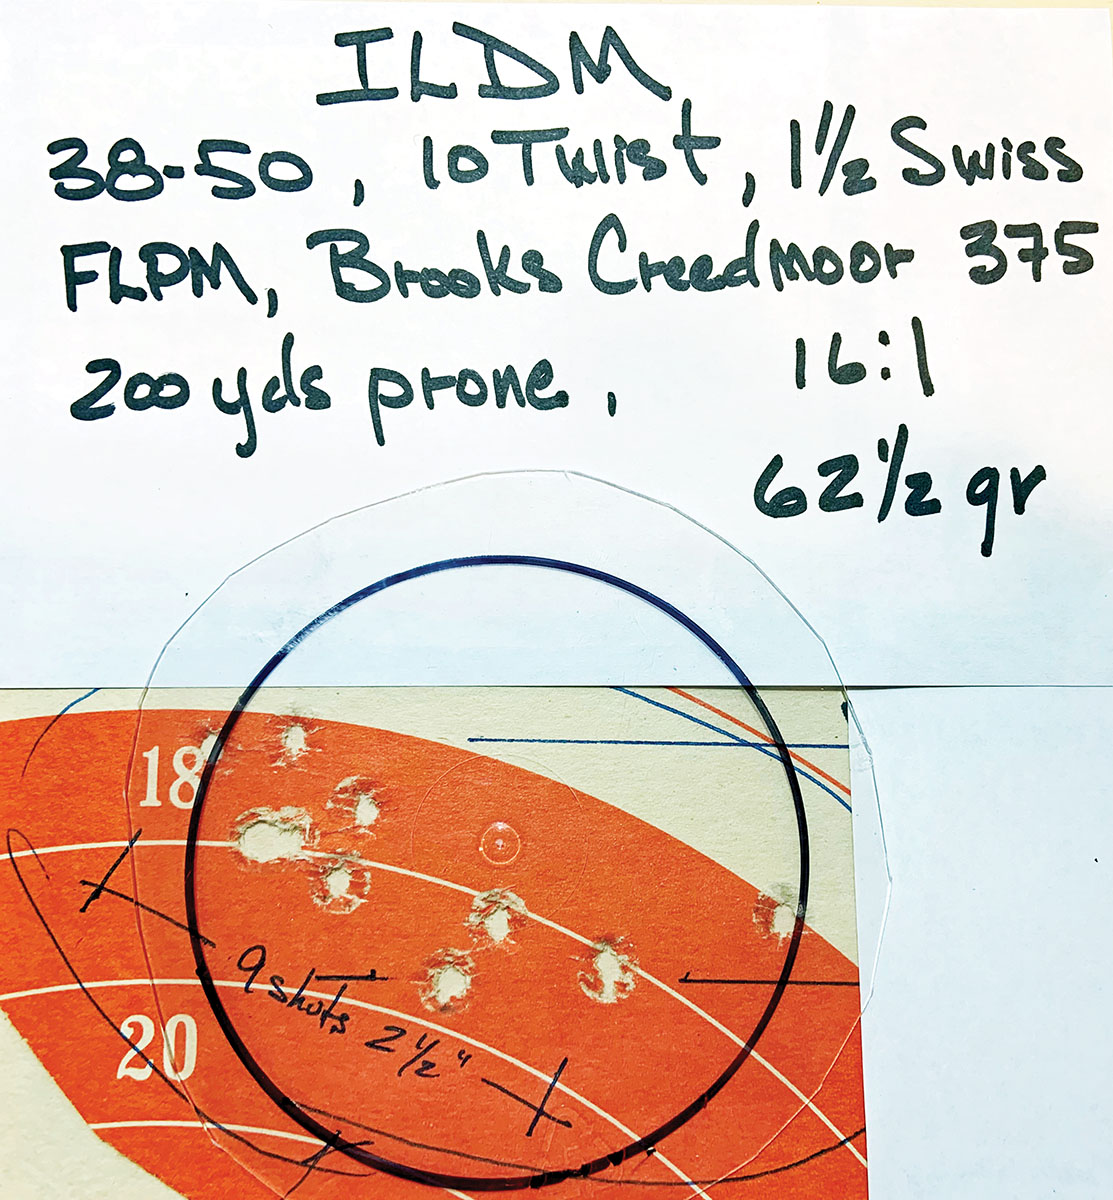
Based upon the shot cluster and the graph, I selected 62½ grains of 1½ Swiss for a confirmatory 10-shot test. The selected testing day had a bit of eight to nine o’clock wind and that showed up on the target with one shot squeaking out to the right. The group is 1.6 MOA, represented by the circle, with nine shots in 1.2 MOA. The vertical is 1.25 inches. In my view, this is a very good shooting load.
Once a shooter has a load that is working well for 10 shots at 200 yards, I recommend testing the load on the turkey silhouette target if you have access to a silhouette range. Under calm conditions, shooters should be able to stay on the turkey target fairly easily. It is also recommended to run a few follow-up 10-shot tests to confirm the results.
Conclusions
References
Rifle Accuracy Facts, Vaughn, Harold R., Precision Shooting, Manchester, Connecticut, page 74.
The Story of Pope’s Barrels, Smith, Ray M. R&R Books, Livonia, NY, page 107.