
Concentricity and Other Things
feature By: Bob Glodt | June, 17
Concentric” means to have a common center or a common axis. To obtain a high degree of accuracy, ammunition must be concentric to the rifle’s bore. Concentricity is something to check every time loads are worked up for a rifle match. And, once achieved, concentricity is something that should never be taken for granted even if the dies are never removed from the

To understand the relationship between concentricity and accuracy, a brief review of what happens when a cartridge detonates in the rifle’s chamber is helpful. When the primer detonates and the powder inside the cartridge case ignites, the brass cartridge case expands to meet the walls of the rifle’s chamber. The bullet is then propelled down the barrel. At the same time this is happening, the case moves rearward to rest against the breechblock. Of course, all this occurs in a split second. After the bullet exits the barrel, the pressure in the chamber drops, and the cartridge case contracts so it can be easily extracted from the rifle’s chamber.
For those who do not resize cartridge cases (slip-fit bullets) or only neck size cases to achieve accuracy, a closer tolerance between the chamber walls and the cartridge case walls does not necessarily ensure concentricity. Accuracy will suffer if a bullet is not concentric to the rifle’s bore, independent of case sizing techniques. The opposite scenario should be considered as well: A full-length resized cartridge case is not necessarily a detriment to concentricity either. People have argued against full-length resizing based on the assumption that the cartridge is “resting on the bottom of the rifle’s chamber,” and therefore the bullet is not concentric with the rifle’s bore. I full-length resize and expand case necks on my black powder cartridge loads, and a high level of accuracy is achievable as long as I ensure that
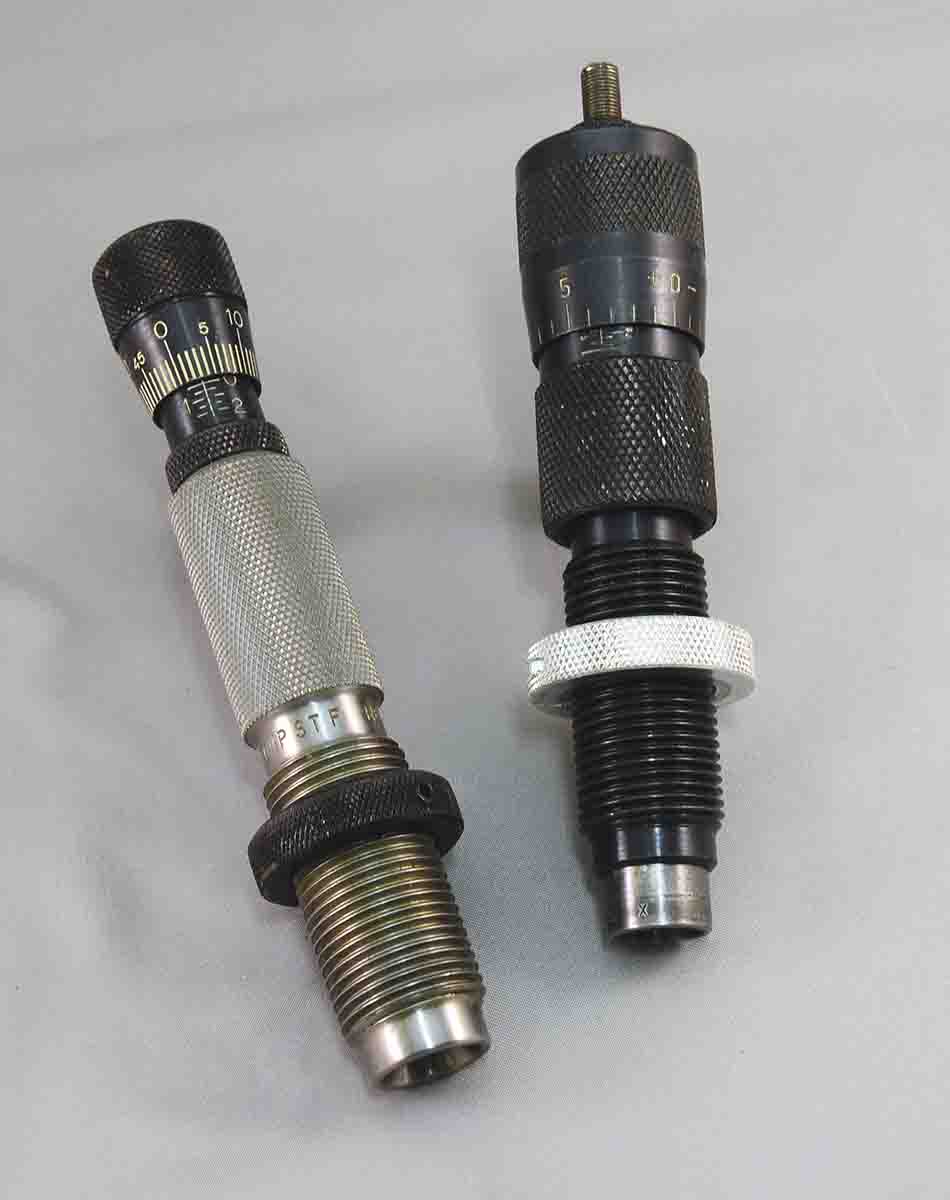
To check for concentricity, it is necessary to have an accurate gauge for measuring. I settled on a good concentricity gauge produced by Sinclair International (www.sinclairintl.com). This gauge is very well made and is capable of measuring runout in .001-inch increments. The Sinclair concentricity gauge can be purchased with a dial indicator or a digital indicator and sells for $119.99.
Achieving concentric ammunition is a process of elimination. It is only logical that it is better to eliminate potential problems by
As mentioned previously, I prefer to full-length size brass cases and expand case mouths. After full-length sizing, several cases are checked using the Sinclair concentricity gauge to make sure there is little or no runout. This process is also repeated after case mouths are expanded with the expander plug. With quality reloading equipment, it is doubtful that much runout after sizing will be found; the needle on the concentricity gauge barely moves on the cases I resize. If runout exceeds .001 inch on fully sized cases, a possible cause may be attributed to either the shell plate or the sizing die itself. Although not common, I have found a few shell plates can be machined improperly, and the cartridge case is not squared with the ram in the press. If the cartridge fits too tightly into the shell plate, it could be a source of nonconcentric cases after sizing. Problems can also arise if the sizing die is over or under tightened into the press. It is preferrable that the sizing die be secured snugly into the press and the lock collar locked into place with the setscrew. By snug, I mean snug, and not tightened with a 12-inch crescent wrench. I use a Redding turret press for sizing .45-70 cases. Once the sizing die is properly secured in the press, and cases are measured to ensure they are not out of round, I never remove the sizing die from the press. Some believe the “floating” sizing die is a good way to size cases to avoid runout. Those who use this technique may insert a rubber O-ring between the top of the press and the lock collar on the sizing die. I’ve tried this technique and have found no advantage to using it. I did not say this will not work, but rather there is no advantage to doing this over just tightening down the sizing die snugly into the press.
To check for concentricity of full-length resized cases and expanded cases, once a bullet is seated into the case, the front adjustable pillar block on the concentricity gauge should be positioned directly beneath where the driving bands of the bullet will be located. The dial indicator plunger is then adjusted so it is directly over the center of the pillar block (below). Insert a cartridge case and apply consistent downward pressure while slowly rotating the case 360 degrees in the concentricity gauge. Repeat this several times on each case that is checked. A runout of less than .001 to .0005 inch should be easily achievable.

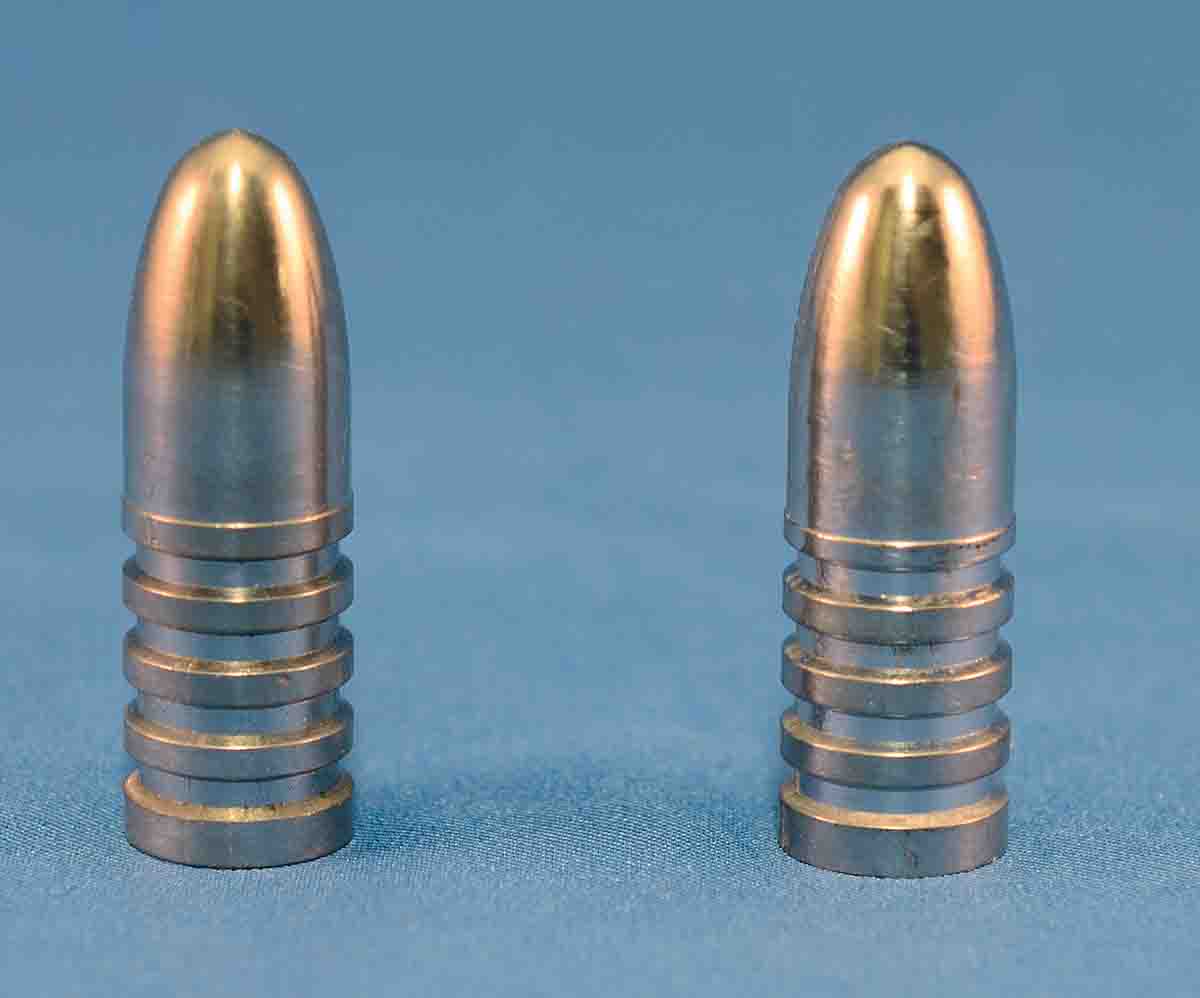
All my bullets are sized and lubed using a Lyman lubri-sizer. It is very important to have a good bullet mould that will cast bullets with a minimum amount of runout to achieve a high degree of accuracy. I prefer never to reduce the diameter of the bullet more than .001 inch in a sizing operation. The two bullets mentioned above are sized to measure 0.458 inch on the four bottom bands. Therefore, when sizing these two bullets, there is only .0005 inch difference between the final sized diameter of the bullet and the largest “as cast” diameter of the bullet.
When lubing and sizing bullets, the top punch must fit the nose of the bullet precisely for the bullet to be sized squarely. Since
Although a little off point, the relationship between the diameter of the bullet, the bore of the rifle and how much a cartridge case is expanded is very important. Sizing bullets more than .001 inch is not good. For example, if the rifle’s bore is 0.458 inch, the bullet should be no more than 0.459 inch at the widest point when it drops from the mould. Oversizing bullets can deform the bullet’s nose and/or the driving bands. It has been my experience that there is no detriment to accuracy if a bullet is .001 inch under or .001 inch over groove diameter as long as the bullet is not deformed during sizing. I prefer bullets to be groove diameter; I own one bullet, however, that measures 0.459 inch to 0.4595 inch when it drops from the mould and shoots very accurately. Rather than size to 0.458 inch, which is the bore groove diameter for my rifle, I size bullets to measure 0.459 inch. Almost every lube sizing die I own tends to size bullets more than the stated diameter stamped on the sizer die. My sizer stamped 0.459 inch sizes bullets to exactly 0.458 inch and the 0.460-inch die sizes exactly 0.459 inch. The sized bullet should be measured after sizing, rather than taking for granted that the die will size the bullet to the diameter stamped on the die. If much resistance is felt when sizing bullets in a lubri-sizer, you are sizing them too much.
Many people prefer to pan lube bullets rather than to size them in a lubri-sizer. The logic behind this approach is sound as long as the “as cast” bullet is not over .0005 inch out of round as it drops from the mould. If you pan lube bullets and load using out-of-round bullets, you are essentially transferring this variability into the loaded round.
In keeping with the “less is better” concept when it comes to sizing bullets, I believe this also holds true when expanding case mouths. My expander plug is custom made and measures .001 inch smaller than my sized bullet. So, if my sized bullet measures 0.458 inch, I use a 0.457-inch expander plug. In actuality, when a brass case is expanded, the brass will spring back slightly, and the internal diameter of the sized case will be slightly smaller in diameter than the size of the expander plug. The bullet should glide into the case smoothly with little resistance when being seated. I have found the relationship between the size of the expander plug and the sized diameter of the bullet to be very important to achieve concentric ammunition. Hard seating bullets have a tendency to seat crookedly into the case.
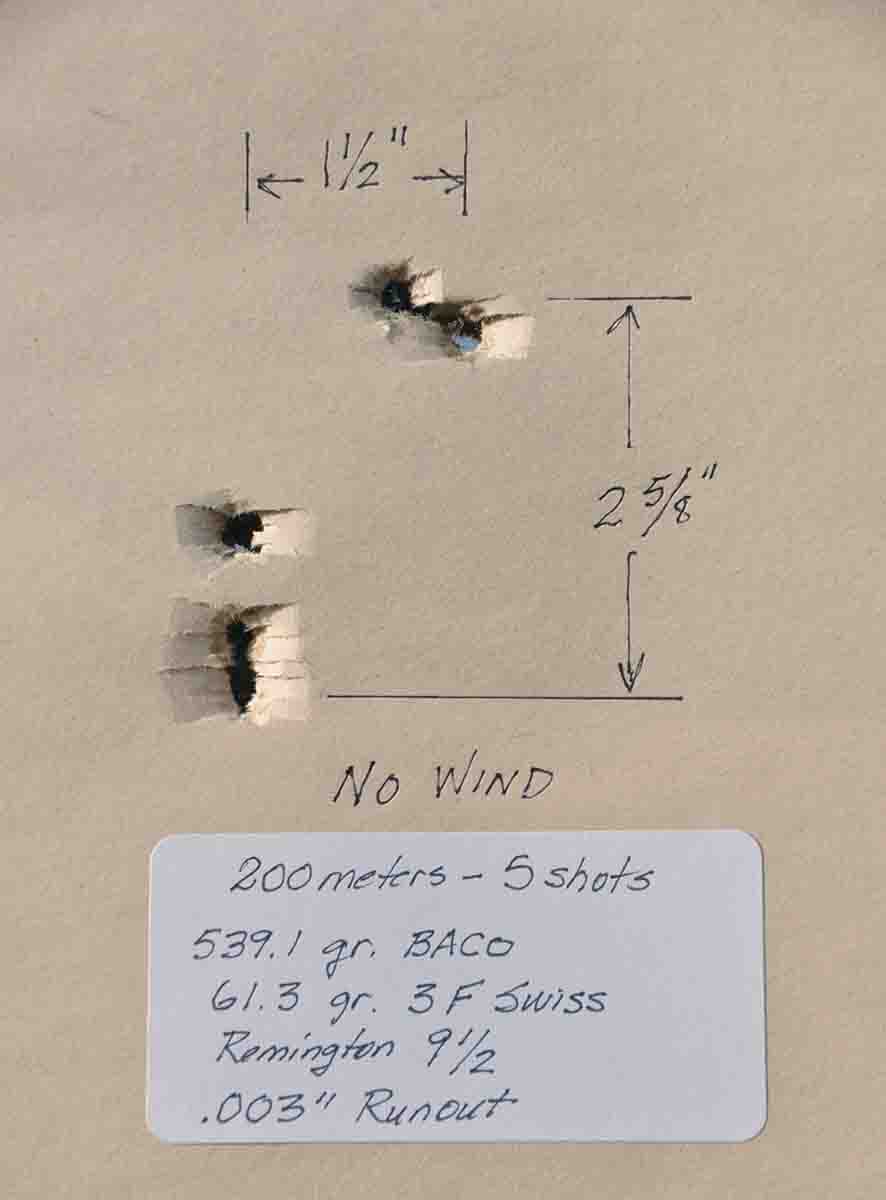
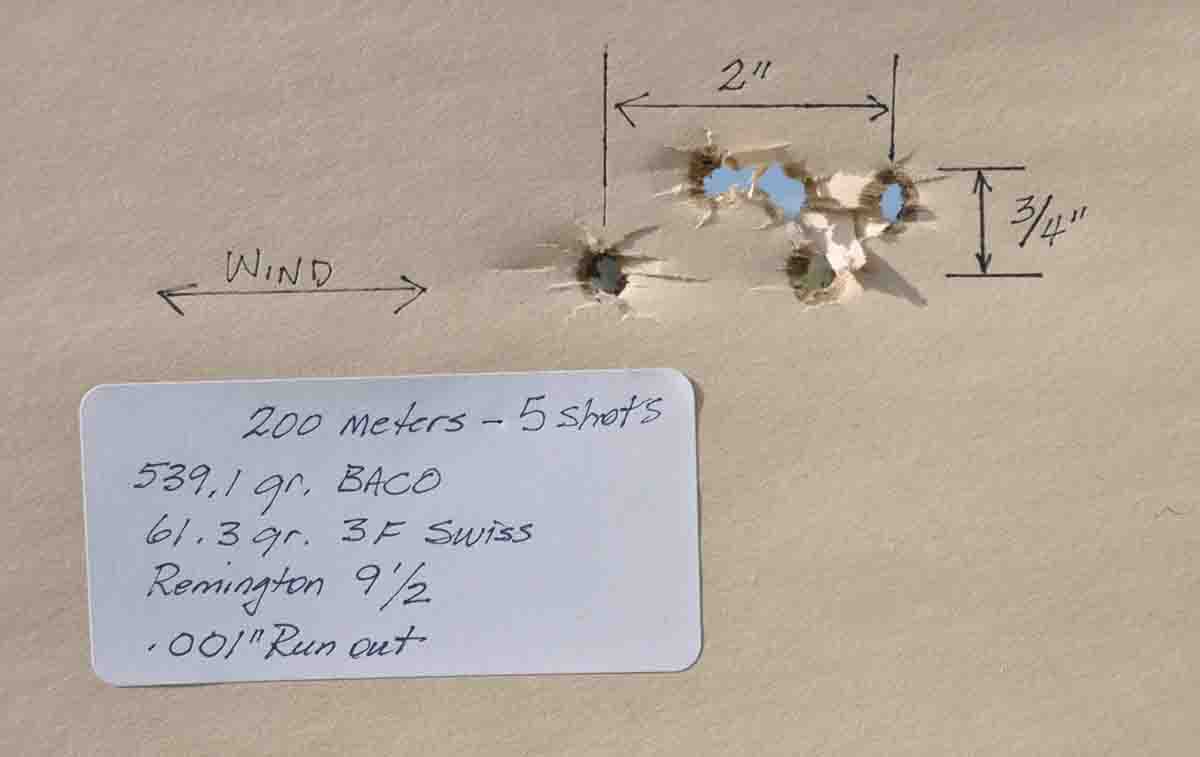
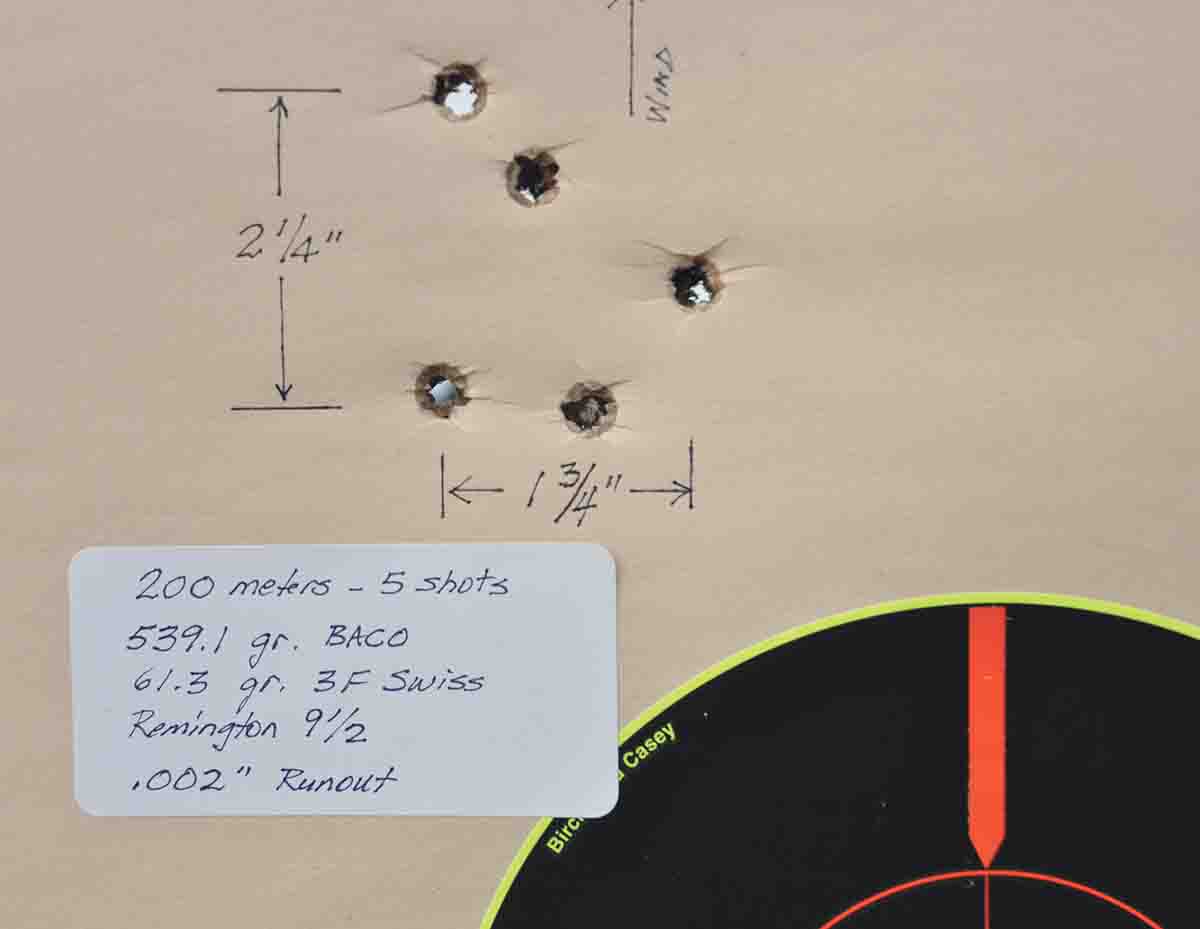
This past fall, I was preparing ammunition for a rifle match that was to be held at Fort Chadbourne, Texas. I had loaded about 40 rounds when I discovered the runout on the nose of the bullet varied from a low of .001 inch to a high of .003 inch in this particular lot of ammunition. Rather than discard the ammunition and start over, it was decided to find out just how much bullet runout affected accuracy. The ammunition was rechecked with the concentricity gauge and the amount of runout for each cartridge was written on the base of the cartridge case. This ammunition was sorted into the following groups: .001-, .002- and .003-inch runout.
Luckily, winds were reasonably calm the day before the match, and I fired five rounds from each of the three differing bullet runout categories. All groups were fired on paper at 200 meters from a cross-stick position. I used a Shiloh Sharps chambered for .45-70 with a 1:16 twist standard Shiloh barrel. The following load was used: BACO 539.1-grain Creedmoor bullet cast 25:1, 61.3 grains of Swiss FFFg powder, Remington 91⁄2 Large Rifle primers, .060-inch Walter’s wad between the powder and the bullet’s base and SPG Lube. A .40-caliber newspaper wad was inserted in the cartridge case beneath the powder charge. My rifle is mounted with a 28-inch MVA 6x scope.
After shooting this ammunition for group, I was a little surprised by the results. There was a pretty significant difference in the size of the group of the .001-inch runout ammunition as compared to the .002- and the .003- inch runout ammunition, but really not as much as I had expected.
The five-shot group for the .001-inch runout load was .75 inch tall by 2 inches wide, with four of the five shots touching or nearly touching. The .001-inch runout ammunition produced a group that measured 1.5 square inches. As you can see in the photographs, both the .002- and the .003-inch groups really weren’t all that bad by most standards; they were near minute-of-angle. When the groups were visually compared, that was when the value of loading concentric ammunition became quite apparent.
The five-shot group for the .002-inch runout load was 1.75 inches wide and 2.25 inches tall with no shots touching or nearly touching. The .002-inch load produced a group that was 3.9 square inches at 200 meters. For all practical purposes, the .002-inch group was 2.6 times larger than the .001-inch load. The five-shot group for the .003-inch runout load was 1.5 inches wide and 2.6 inches tall with no shots touching or nearly touching. The .003-inch load produced a group exactly the same size as the .002-inch load, that being 3.9 square inches.
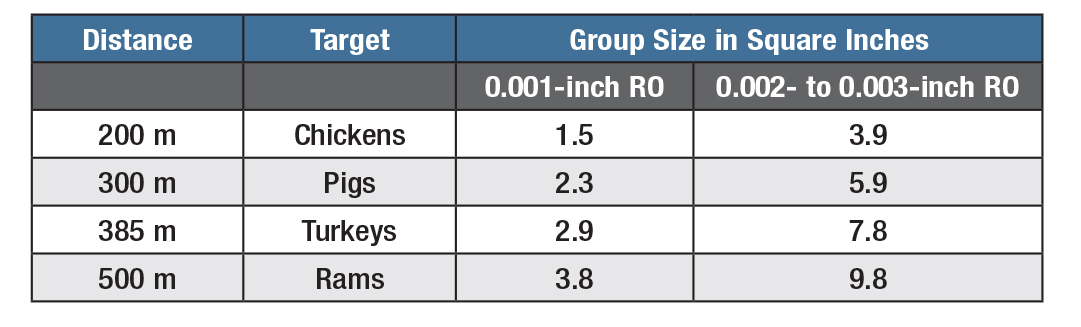
When you mathematically figure how large groups would be at 300 (pigs), 385 (turkeys) and 500 (rams) meters, the difference in accuracy between .001-inch runout ammunition and .002- or .003-inch ammunition becomes even more apparent.
I have found over many years of shooting black powder cartridge silhouette competition that shooters tend to adopt different loading techniques to achieve accuracy. For example, some choose not to full-length resize cases, while others only neck size. Then there are those who believe in full-length resizing cartridge cases. Similarly, there are those who pan lube bullets while others use the lubrisizer. New shooters sometimes fall into a trap of believing that a specific way to load ammunition is necessary for accuracy, rather than understanding the common denominator that makes all of these techniques work. If your goal is to produce extremely accurate black powder cartridge ammunition, it is crucial to consider how your approach to loading affects concentricity of the loaded round.