Mastering Prone
feature By: Bob Glodt | April, 17
I wasn’t a very good shot when I first began participating in black powder cartridge silhouette competitions in 1992. Even though my shooting career began at a very young age, and I had extensive experience shooting everything from BB guns to flintlock rifles, that experience wasn’t evident when I posted a score of 6/40 at my very first black powder cartridge rifle
Early in my black powder cartridge silhouette compe-titions, several years were spent trying to improve my poor performance at rifle matches solely through load development. If someone had good luck with a specific bullet, powder or primer combination, I would eagerly purchase those components and try them out. My efforts to improve loads did pay off, because I was able to eliminate ammunition as the reason for poor match scores. In competition, however, excellent groups from the bench did not always translate to good scores on the silhouette range. So, if loads were not the problem, it had to be my marksmanship skills.
After years of extensive black powder cartridge load development, as well as participating in literally hundreds of matches, I realized I was very good at reloading accurate ammunition, but my shooting skills were poor. I came to the conclusion that I was a good “plinker” but not a good marksman. In competition, misses counted against your score, whereas, when plinking at tin cans an occasional miss was not only expected but accepted. Looking back, I know it took much longer to develop good shooting skills than it did to learn how to reload accurate black powder cartridge ammunition. No doubt others have experienced the same problem described in the narrative above.
So, I decided to dedicate myself to mastering the skills necessary to become a good marksman, beginning by reading books on marksmanship and making a conscientious effort to apply good marksmanship techniques each time I shot a match. Although I hadn’t yet mastered the off-hand position, I now can shoot well enough off cross-sticks to positively eliminate shooter error as the reason for a miss. If a target is missed, I know for certain if the miss was caused by me or the wind. And knowing what caused the miss is crucial in recovering and picking up the next animal. It all boils down to paying attention to shooting position and technique, and this is the subject of this article.
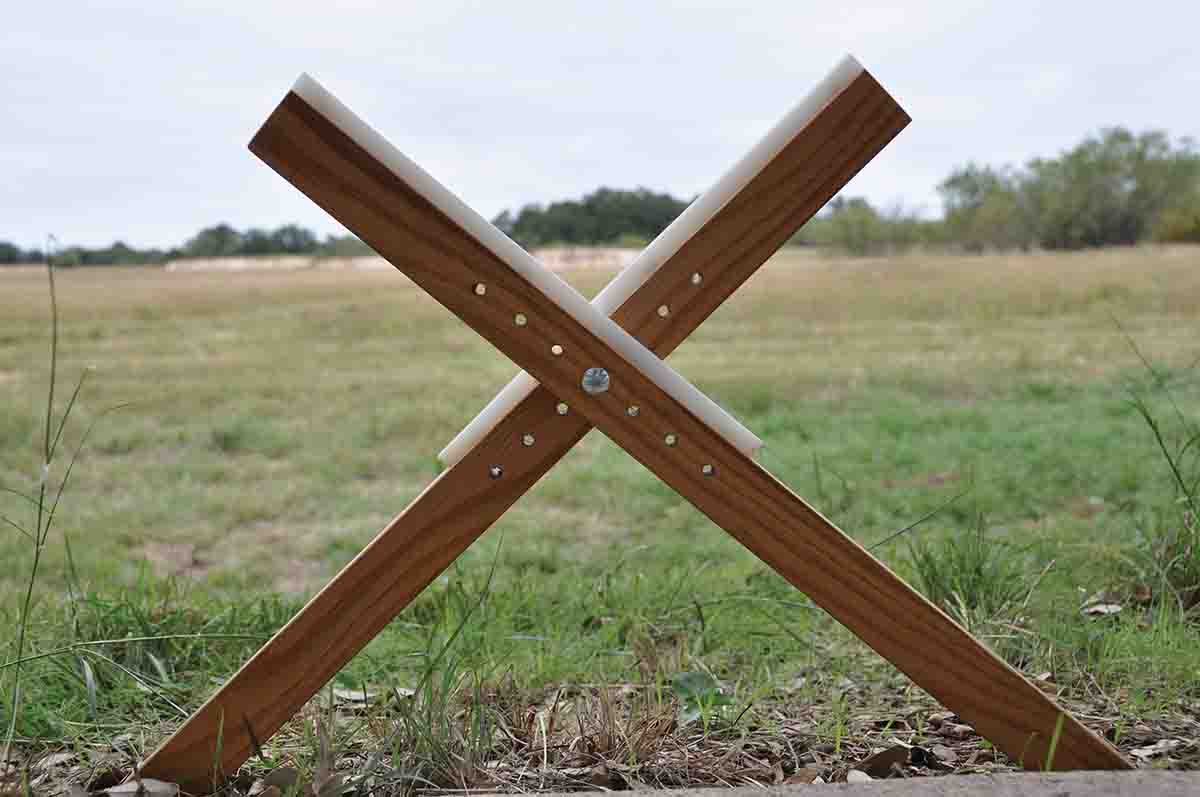
In our sport, we are allowed to use cross-sticks to support the rifle from the prone position for all targets except chickens. Cross-sticks can definitely complicate or compromise good shooting form. It is important to realize that the placement of the cross-sticks should not determine your shooting position, but rather your shooting position should determine how you place the cross-sticks. A good prone shooting position should be solid, steady and comfortable. A good position for me may not be a good position for someone else, but there are basic fundamentals of marksmanship that apply to us all, regardless of individual physique.
An exercise in self-diagnosis is needed when striving to improve one’s marksmanship skills. I suggest taking time before or after a match and work on your prone shooting position. Start by assuming your normal prone position on the firing line. Adjust the cross-sticks as if you were to shoot for score. If the rifle is equipped with a set trigger, set the trigger but do not cock the hammer. Once on target, press the trigger while concentrating on holding sights steady on the target. I am not advocating that you dry fire the rifle by allowing the hammer to fall on an empty chamber! This procedure should be repeated several times to determine if the rifle moves while pressing the trigger.
Was any movement in the sights detected while holding on target? If so, and your hold wasn’t rock solid, your prone position needs improvement. “Rock solid” means the target does not move at all in the sights, and the sights should stay on target while squeezing the trigger. While breaking the shot, there should only be three points of concentration, one on the target, one on breath control and the other on the squeeze of the trigger. If you are in a good position, you should not have to fight the gun for the sights to remain perfectly aligned on target.
I suggest mounting a scope on your rifle to conduct this exercise, since sight misalignment or movement is easier to detect through a scope as compared to iron sights. If your sights move around on the target, there will be a tendency to snatch at the trigger in order to break the shot before the sights move off the target. If you cannot hold steady on the target before the trigger is pressed, your prone position is not good enough to achieve a consistently high percentage of hits.
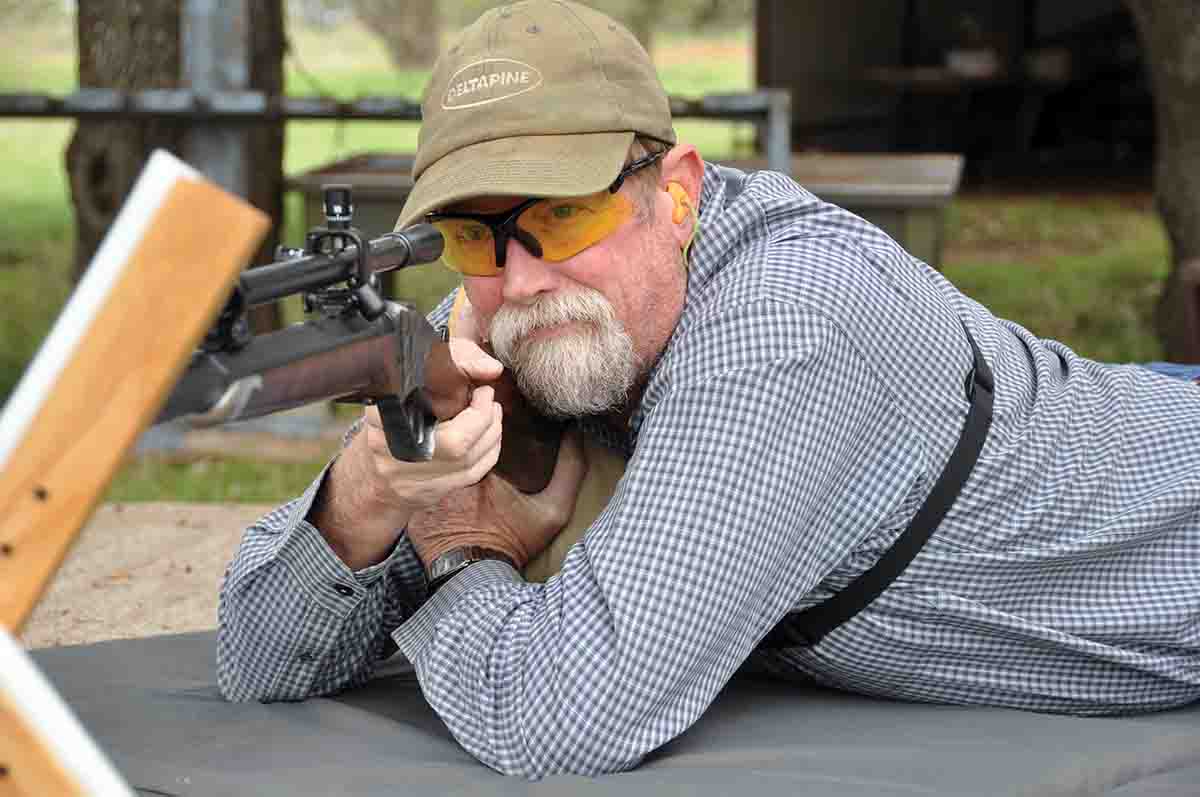
If you were not rock solid in your hold on the target, the problem may be attributed to one or more things. The first thing to consider is the height of your shooting position. If you are resting on the point of your elbows, this would be considered a high-prone position.
When shooting from a low-prone position, the points of my elbows do not rest on the mat. Figuratively speaking, my elbows point east and west, and the inside of my arms come in contact with the mat. In a low-prone position, I lay flatter on the mat than in a high-prone position. To keep from having to crane my neck to see through sights, I adjust my body approximately 15 degrees offset from the plane of the rifle. Also, my right leg (left leg for a left-handed shooter) is slightly bent at the knee. By bending my knee, my body is ever so slightly positioned on my left side, which in turn allows me to turn my head sideways rather than straight back while looking through sights. Positioning slightly on my left side rather than flat on my chest also eliminates problems with attenuated heartbeat. I can also raise my head just enough to see through sights without experiencing neck tension. The low-prone position also allows for a better and more natural grip on the pistol grip of the rifle, without excessively bending my wrist. Therefore, I have a more natural extension of the trigger finger while shooting from a low-prone position. The biggest advantage to a low-prone position is that the rifle butt is cradled in my arms, and the off hand is used to steady the buttstock. When in a proper low-prone positon, the hold is rock solid with no neck or back tension and sights are squarely on target.
A consistent cheek weld on the buttstock is absolutely essential for accurate shooting. Your cheek weld should be a light touch, or just enough to steady your head so you can see through the sights without moving your head up and down. From a low-prone position, my cheek weld is actually sandwiched between my left shoulder and the buttstock. A good cheek weld can usually be achieved in either a high- or low-prone position. A too-hard cheek weld is not good. A good prone shooting position should cradle the rifle without having to unduly apply force to keep sights on target.
After experimenting with the prone position in a dry-fire scenario, it is now time to repeat the process, except this time shooting rounds on target. Whether or not the target is hit is really not important; just dial in your sight setting and take several shots at a silhouette animal while concentrating on hold, trigger break and follow-through. Now comes more diagnosis.
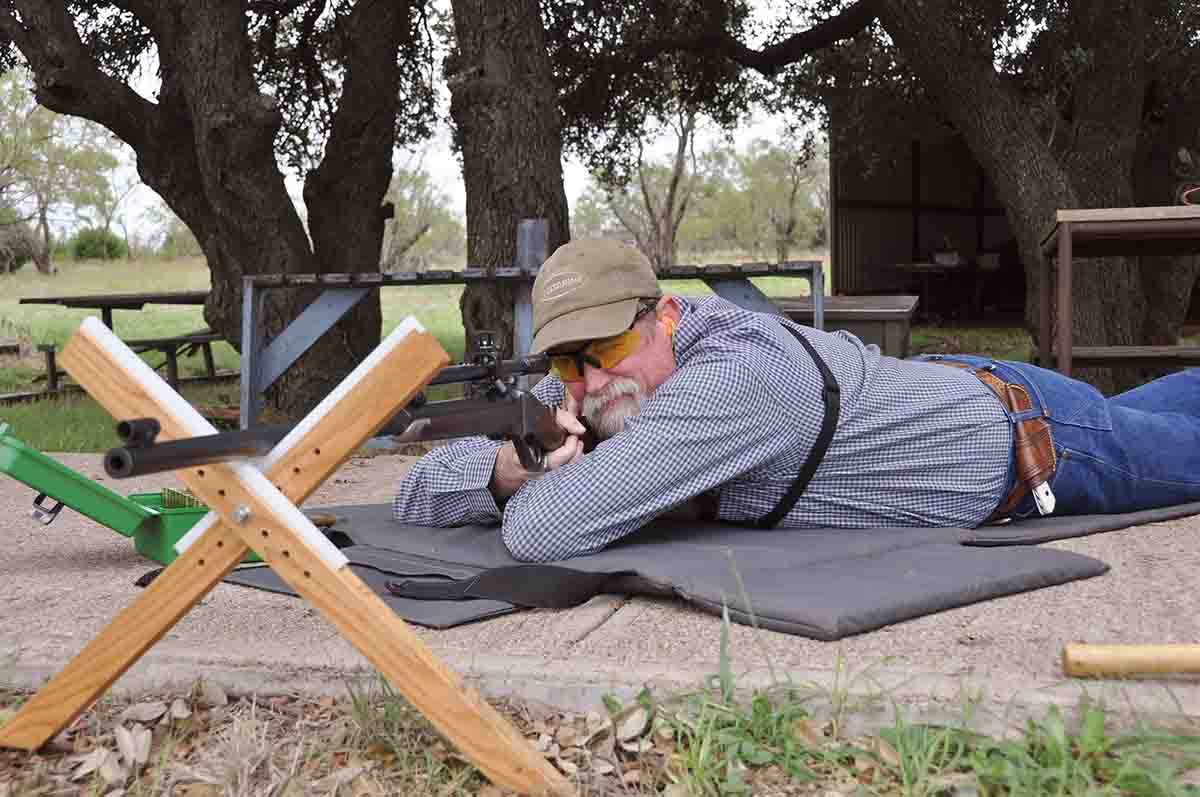
Cross-sticks must be perfectly adjusted to achieve a good prone position. Before firing a shot, sight in on the target, close your eyes and then open them. If sticks are adjusted properly and your body is in the correct position, you should still be relatively on target. If the sights are high or low off the target, adjust the cross-sticks up or down. If you are right or left of the target, then move your body to correct this misalignment. You should never have to strain or pull the gun onto the target to keep the sights on target and steady. As stated previously, never make your body conform to improperly adjusted cross-sticks. That is a sure recipe for misses.
The rifle barrel should slide freely on the cross-sticks and not bind during recoil. Some shooters use a piece of leather as a pad between the cross-sticks and the barrel. Others use a piece of cotton cloth. Whatever material you choose should allow consistent and free movement of the barrel during recoil. My homemade cross-sticks have a strip of plastic or Delrin inserted into them where the barrel rests.
Upon firing several rounds downrange, additional assessments of shooting form must be made. If the rifle barrel bounces off the sticks rather than the rifle recoiling straight back into the shoulder, adjustments in the cross-sticks or shooting position need to be done. When in a good prone position, the shoulder and body should absorb the recoil of the rifle, and there should be no barrel bounce. If the barrel bounces off the cross-sticks, this is a serious problem. And, if not corrected, groups are usually very large. I have found that the unexplained misses are usually due to barrel bounce off the sticks.
Once adjustments to your prone position have been made to achieve a steady hold, it is now time to shoot groups on paper from the cross-stick supported position. This is where you fine-tune as well as learn how seemingly small errors in shooting form can result in big misses. When shooting on paper, I suggest you first foul the barrel with three shots taken off the target. Then shoot five-shot groups on paper. Be sure the paper target used allows for good target acquisition and provides for a clear sight picture.
When shooting on paper, it doesn’t bother me too much if I have a tight group and pull a shot or two out of the group, as long as I can call the shot. I will keep shooting at a target until I have five good “breaks” on target. If your load is accurate, one-inch, 100-yard groups are achievable with black powder cartridge loads. That is assuming your rifle is accurate and capable of shooting groups that small.
When shooting on paper, concentrate on trigger control and sight picture. The eyes are always open while slowly pressing the trigger and holding the sights on target. If you have good trigger control, the shot should be a surprise, and the target should still be at the same aiming point when the round fires.
A too-firm hold on the pistol grip can result in large groups. If you are in a good prone position, it is not necessary to have a tight hold on the pistol grip to keep the rifle pulled into your shoulder. The amount of hand pressure exerted on the pistol grip should be on the light side of firm and consistent from one shot to the next. It does not take a firm or tight grip to prevent the gun from torquing during recoil or from preventing the hand from coming off the grip when the shot is fired.
Proper breath control is an important aspect in achieving accuracy. I take a couple of normal breaths and exhale, the third breath is taken and about half is exhaled. The body can quickly be deprived of oxygen if you fully exhale before making the shot. Holding a full breath while pressing the trigger is uncomfortable and there is no advantage to it that I can see.
Thumb positioning on the firing hand is a matter of preference. Some people prefer to rest the thumb straight and alongside the side of the stock while others fold the thumb over the top of the pistol grip. Experimenting with both thumb positions is recommended. I use an “over-the-top” of the pistol grip hold, because it helps prevent torquing during recoil, but this is purely a personal choice.
Some shooters are very concerned with barrel resonance. In our sport, it is not uncommon to see rifles on the line with the barrel wrapped with tape to mark the exact spot where the cross-sticks will rest from one shot to the next. Although I don’t place tape on my barrel, I consistently place the barrel on the cross-sticks in the same place for each shot, give or take an inch. I use my front scope mount as an indicator as to where the barrel should rest on the cross-sticks. I believe that barrel resonance can be a factor, especially if you rest the barrel on the cross-sticks too close to the muzzle or if you drastically change barrel placement on the sticks from one shot to
the next. The only way to find out if cross-stick placement is affecting accuracy is to shoot groups on paper with the cross-sticks positioned at different places on the barrel.
If good groups can be shot from the benchrest position but the same level of accuracy from a prone cross-stick supported position is difficult to achieve, the prone position is the source of the problem. I have heard more than one shooter proclaim that their rifle is capable of shooting better groups than they are capable of shooting. If that is your claim, poor marksmanship skills can be fixed.
ADDENUM-
Bob and I visited about this article before it went to press, and he wanted me to pitch in my 2¢ worth. Bob’s advice is spot-on in my estimation and is in line with my experiences of trying to improve my BPCR silhouette shooting. One thing I would mention concerns the high- or low-prone position. Personally, I have never been able to take as low a position as I’ve seen Bob take, but not because I don’t believe the low position to be better. I have some issues with my neck that preclude me from getting that low to the ground, as it will pinch nerves and seriously hamper my eyesight. If I could take a low position I would, as I firmly believe it to be more solid.
I also think that a low position makes for more repeatable management of heavy recoiling rifles, such as the .45-70 or .45-90. Early on in my silhouette career, I went to .40s and even .38s due to the neck fatigue I encountered with the heavier calibers. I shot better overall when I didn’t have the increased recoil and could shoot from a more comfortable high position.
Bob’s advice on prone is solid and a great basis to work from. Given our different body types, each shooter has to work out the best position for himself. It’s called range time, and nothing can take the place of it.
– Ed.