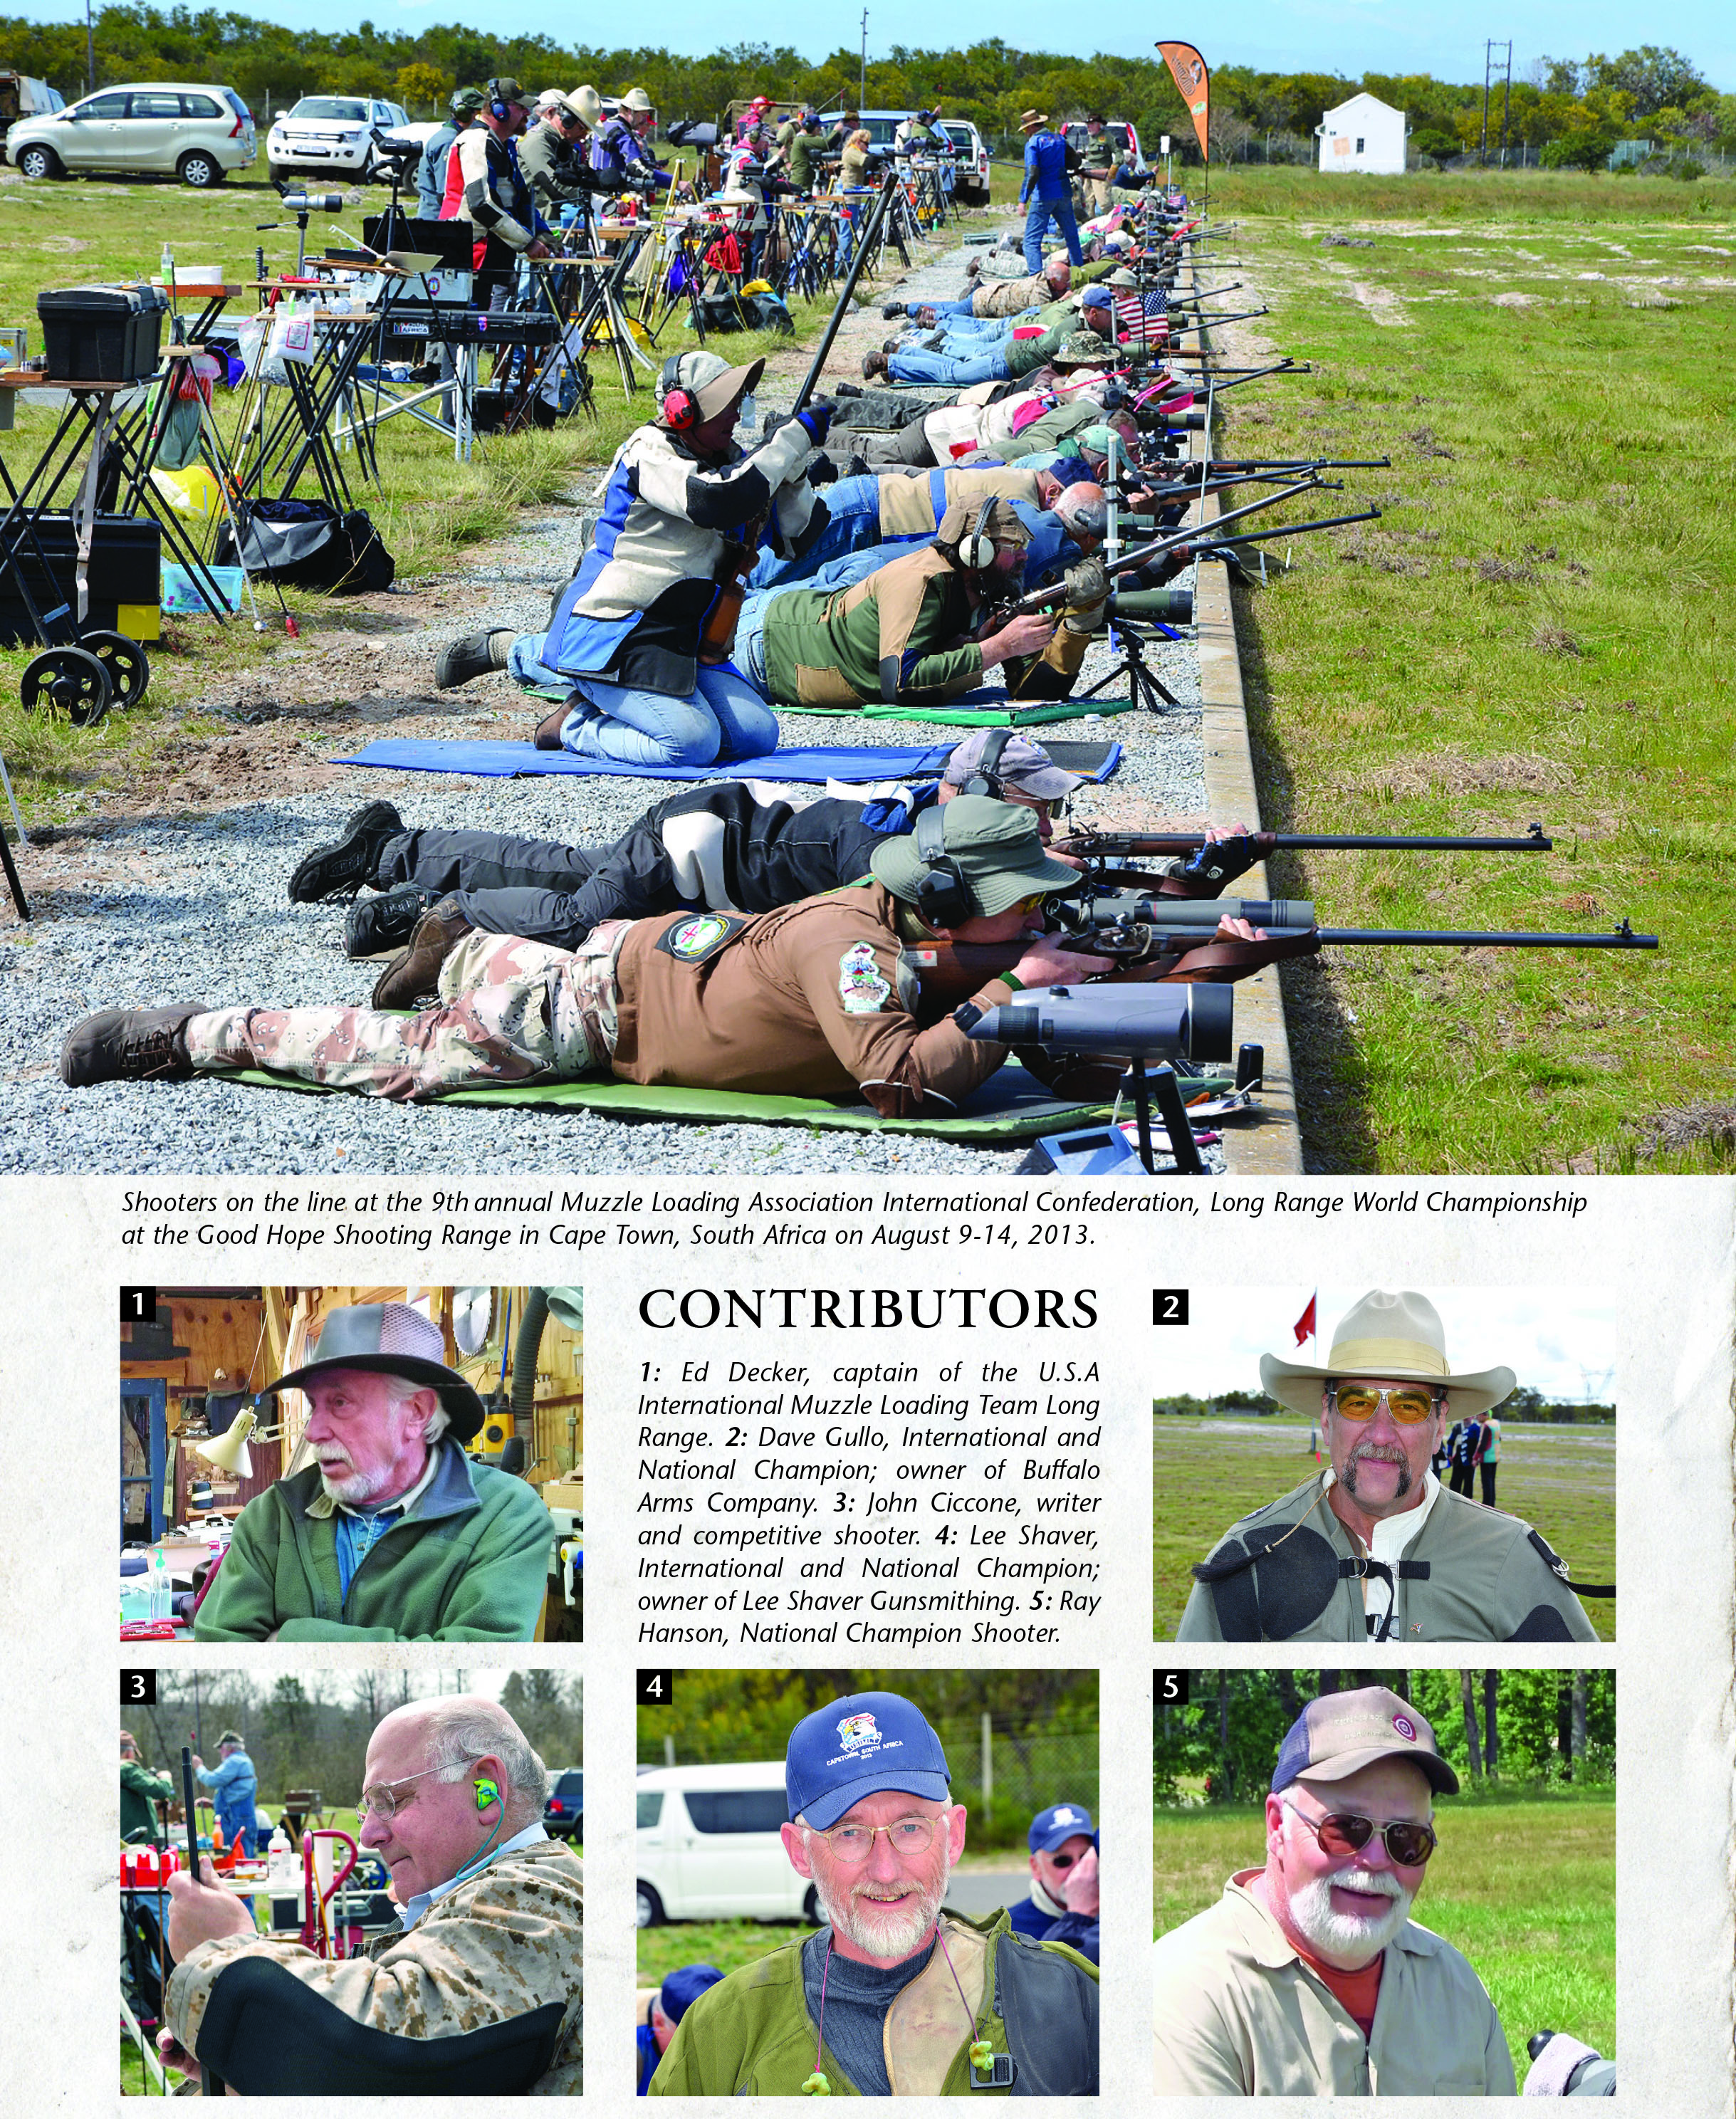
Beginner's Guide To Long Range Muzzeloading
feature By: John Ciccone | December, 17
In this article, some aspects of competing will be reviewed in what may be the most challenging of all rifle disciplines – long range muzzleloading at distances from 300 to 1,000 yards.
The key is consistency, which comes from discipline in all facets of shooting. While every element of rifle shooting won’t be covered, some salient points will be reviewed: equipment needs, plumbing and zeroing sights, paper patch versus grease groove bullets, and more. A lot of what will be covered in this article is directly applicable to cartridge shooters as well.
Equipment
Rifles: A percussion lock firearm with a heavy, fast-twist barrel of .45 caliber and a stock configuration designed for prone shooting is recommended. Lee Shaver suggested any twist rate that works well for cartridge guns will work well for the muzzle loading game. Dave Gullo offered that a used Pedersoli Gibbs may be one of the best ways to go. They typically run about $2,000 new, and they are readily available. Pedersoli rifles are also good for entry-level shooters as well as experienced shooters. Used rifles should be inspected for bulged barrels, damaged crowns and worn rifling near the muzzle from not using a cleaning or loading rod guide and slowly wearing the rifling.
Other rifles one may find on the line include original and reproduction Gibbs, Volunteers, Whitworths and custom-made under-hammers. Originals are often regarded as heirlooms and greatly valued. Original guns that have relined barrels are also found, and depending on the match, may be classified as replicas. In some matches, replicas and originals are segregated into their own classes.
One of the best reproductions is considered by many to be the Ferriss Creedmoor Rifle built by Lee Shaver. As a custom rifle it’s a little more expensive than a standard Pedersoli, but the fundamental design is what is said to make it superior. The Pedersoli uses a hooked breech, which, if the barrel is not properly bedded, can result in the hook slipping when the rifle is fired. By contrast, the Ferriss barrel is inserted into the frame (action) and pinned. No slippage can occur, as it is not dependent on bedding.
Platinum-lined nipples: Diameter of the nipple hole is important. Shooting out to 1,000 yards employs hefty charges of powder, between 80 and 105 grains of 1½ Fg or FFg and a heavy bullet. Some shooters will use a smaller charge, perhaps around 70 grains for 300 to 600 yards. The resulting blow-back of hot gasses will quickly burn out the nipple hole and Shaver notes that stainless nipples can burn out in as few as 30 shots. Gullo revealed that as enlargement continues, point of impact will change from shot to shot. If allowed to increase, the gases escaping from the nipple can cause blow-back of the hammer, damaging the lock. To prevent this, many shooters use platinum-lined nipples. They cost about $60 but will last for years.
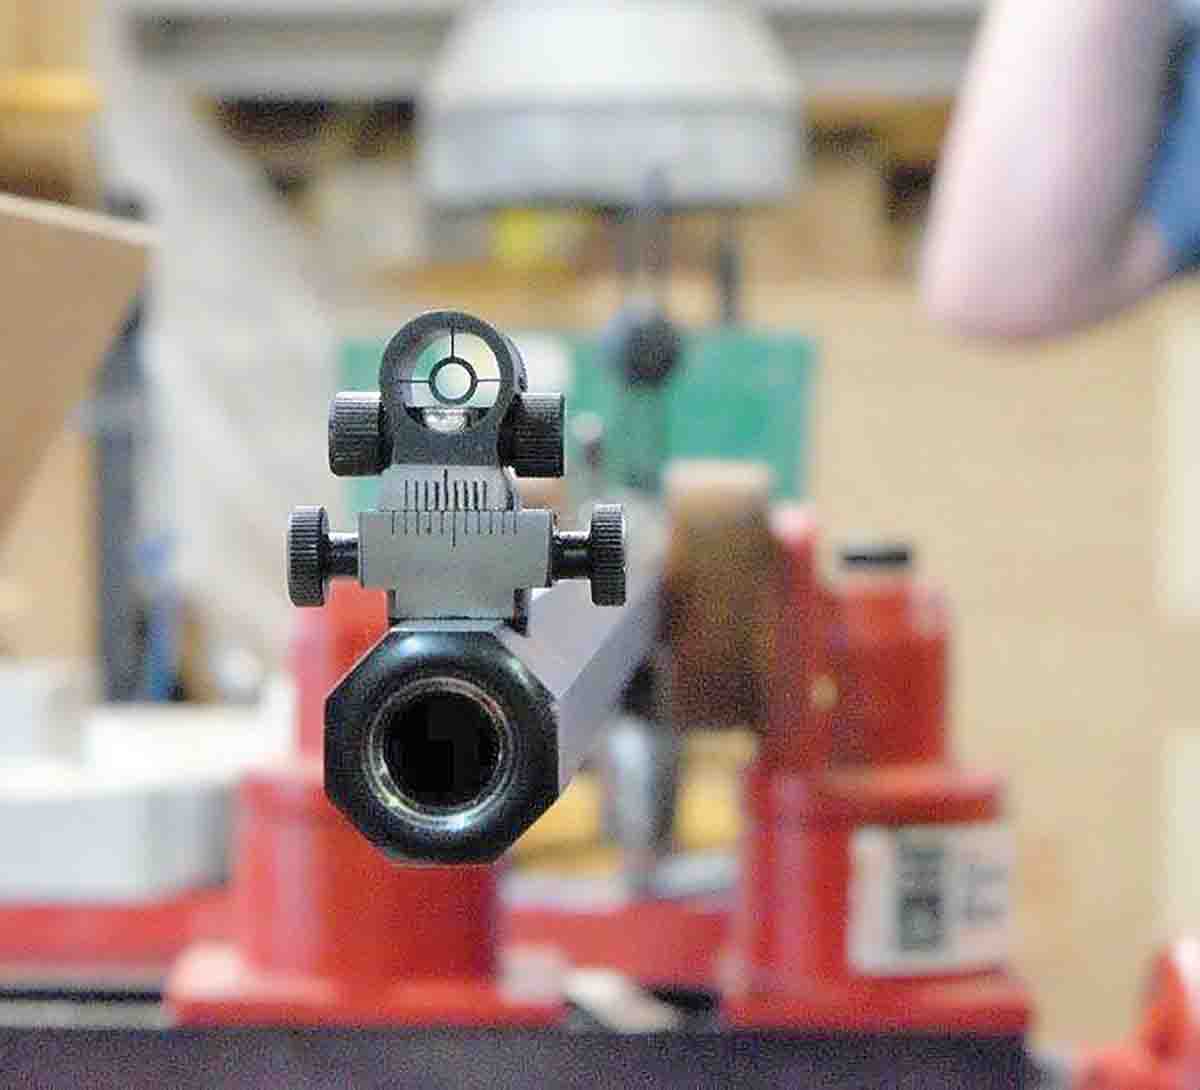
Sights: A long-range rear sight is needed, such as those that use a Vernier adjustment scale with adequate elevation and windage. An ideal globe front sight will have adjustments for windage and use of a spirit level is critical. Obviously, the front sight should be very firmly secured in the dovetail. Makers include Montana Vintage Arms, Kelley Sights, Lee Shaver Gunsmithing, C. Sharps Arms, Baldwin Sights and Pedersoli, all of these companies can easily be found using Internet searches.
How to Plumb Sights
Of prime importance concerning sights is making certain that they are plumb. Ed Decker, the USIMLT long-range team captain suggested a method where the rifle is placed in a vise and plumbed with a spirit level, then
How to Zero Sights
Lee recommended that the shooter carefully measure for alignment when setting up sights, but always follow up by shooting the rifle at 100 yards, and moving the front sight so the rear sight is centered at 100 yards when there is no wind.
He also offered this bit of wisdom:
“Always plumb the rifle and sights first, of course, or you can end up with the front sight well off-center – when everything is plumb the front sight should be very close to center. I then only adjust the front sight to adjust for the fact that the bullet wanders to the right a little farther at each yardage, and I do that so my rear sight can remain centered in a no-wind condition. Others set their sights up differently and have different plans on how to handle things, but the most important thing is to know the rifle and have a plan. Not having a plan costs you points every time.”
Bullets and Moulds
When shooting black powder cartridge, you usually cast your own bullets. Many different bullet designs are used, but shooters such as Dave Gullo and Lee Shaver – both of whom have earned multiple international, national, and regional championships – recommend a Postel-shaped bullet made with a 20:1 (lead-to-tin) alloy, a bullet length of about 1.460 inches and a bullet weight of about 540 grains for an 18:1 twist rate in a .45 caliber rifle. One bullet designed by Lee Shaver was even inspired by the nose shape of commercial jetliners! Dealers that specialize in black powder cartridge rifles will usually offer a selection of moulds.
There are almost as many different bullet shapes selected as there are shooters: ellipticals, roundnose, Creedmoor, and so forth. Moulds are made by Steve Brooks, SAECO, RCBS, Lyman, Buffalo Arms, Corbin (for swaging enthusiasts), and others.
In .45 caliber, the author has found the “Money” bullet, originally designed by Dan Theodore, to be excellent. It is 1.5 inches long with a .650 inch nose, .450 inch in diameter and weighs 550 grains. This mould is a mini-grease groove design to be used only when cleaning between shots. The mini-grease groove is claimed to make the bullet somewhat more streamlined in shape for a flatter trajectory.
“Should I use grease groove or paper patch?” is a very common question. For grease groove bullets, the question seems relatively simple. Gullo, who uses SPG and has won almost all his matches with it, stated that SPG Lube is the most commonly relied upon lubricant, although almost any good-quality product will suffice. He has garnered 38 international, national, and regional championships. Most accomplished shooters recommend a very close fit. Dave added as an example, if the bore is .450, an ideal bullet diameter would be .4495. Lee Shaver likes his bullet just tight enough so that it will barely hold the weight of the loading rod.
Paper Patch Bullets
There is an ongoing debate about the best approach to paper patched bullets. The following discussion contains several distinct views on paper patching that cover a range of opinions.
Ray Hanson offers his thoughts on paper patch bullets:
“First off, most people’s opinion of PP bullets is what they have been told or experienced when experimenting with cartridge rifles. Loading PP in a cartridge rifle adds several potential problems that do not exist in a muzzleloader.
But all those issues go away with the muzzleloader. The PP bullet will not get too hot if a firing line stoppage occurs after loading a new shot, which would allow the grease on a GG bullet to melt. The PP bullet does have a ballistic advantage over and above a GG bullet (both being similar weight and shape).
While this advantage is overstated at times, it does exist and is a plus in long-range competition. PP bullets also create more resistance in the bore. Velocities usually come in about 40 fps slower than with GG using the same powder charge. I have found and believe this is a factor in increasing uniformity with standard deviation in velocity. This is very important, particularly in 1,000-yard shooting. The greater ballistic coefficient makes up for the velocity loss and then some, plus there is less wind drift as well. Paper patch bullets are to a muzzleloader what grease groove bullets are to a cartridge rifle.
It usually boils down to people having trouble making a PP bullet. When done right it does not take any longer when all steps are considered to make a PP bullet rather than a GG bullet. Paul Matthews has a book called “The Paper Jacket” that has some good ideas and is worth reading.
I have found that cutting patches is the most problematic step in PP bullet making. I have determined that a rotary fabric cutter in conjunction with the cutting board sold for them is a real deal maker. Once the angle is figured and the length is proven (be sure the paper grain is cut length-wise and not across the grain), I can cut a thousand or more patches in less than an hour. The rotary cutter is key.
For applying the patch I use a patching board. It is nothing more than a piece of 1x12 with a dado cut length-wise that will cradle the bullet firmly. It has a stopper at a right angle that the bullet nose butts against. Then, a right-angle line is drawn at the point the patch is to be indexed on the bullet. Dip the patch for about a second in lukewarm water and slide it onto the index line across the groove. Put the bullet in the groove up against the stop. Roll the patch on. I fold the base paper rather than twisting. The folding also helps insure the patch does not strip on loading. Then the bullets are placed in a loading block, base down to dry.
Once you get the hang of it, when all things are considered, you will be able to produce PP at the same rate as GG. PP bullets cast faster but it is more time consuming to patch than to lube and size a GG. In the end, it takes about the same amount of time for either bullet.”
Ed Decker and Lee Shaver added their advice to the discussion:
“When I [Ed] first started shooting paper patch bullets, Arleen [Mrs. Decker] was pulling targets for me and said, “What’s this paper falling at my feet?” I discovered that the sizing in the 100 percent cotton paper was gluing my patch on the bullet, so now I always wash my paper first and the paper falls off a few feet in front of my position. I use distilled water and wet my patch, as water that goes through a water softener will stretch the paper. Also, cut the paper against the grain rather than with the grain or it will stretch.
After loading the powder and a wad down the barrel, either lube the patched bullet or lube the barrel before the bullet is inserted. There are lots of different opinions on lubes, but I use, as does Lee Shaver, Mobile 1 motor oil.
I do lubricate my bore before loading my PP bullets and find that procedure tends to even out any velocity variation between my GG and PP bullets. I have not taken the time to prove it with a chronograph but my sight settings are nearly the same with both type bullets at all ranges as long as the weight is the same.
I use the single-wrap “Chase” patching system and never wet my patches, wrap them only once and it does not matter in the least to me which way the grain is running.
The double-wrap paper patch system was designed – I believe – to keep the paper on the bullet while running around a battlefield with the bullets in a hip pouch. All the fuss about wetting paper, washing paper, grain direction and stretch is all about how to do the double-wrap method and still get the most accuracy out of it. The single-wrap “Chase” patch system was developed purely for target shooting and eliminates all that fuss and worry.”
Powder
Almost all shooters use Swiss black powder, typically of 1½ Fg or 2Fg granulation in U.S. nomenclature. Swiss seems to be cleaner burning, more consistent, and more energetic per unit of measure than any other brand. In the author’s experience, black powder substitutes are not considered competitive by the vast majority of shooters. Moreover, for those who travel overseas to compete, Swiss powder will be available in all of the countries where MLAIC matches are held. Black powder is prohibited on commercial airline flights, so shooters cannot bring their own.
Cleaning and Loading Techniques
The guns that are used will have extremely tight tolerances between bullet and barrel. Guns must be cleaned between shots to remove fouling to enable loading and maintain a stable bore condition between shots.
On the subject of cleaning, Lee Shaver’s mother always said, “Cleanliness is next to Godliness,” and the same is true with these rifles. According to Lee, “A proper cleaning technique that gives match-winning accuracy
As far as cleaning solutions are concerned, many shooters have used 25 percent Murphy’s Oil, soap and water. M-Pro 7 can also be sprayed on a patch. Patches should be moist but not dripping wet. There are two different cleaning and loading techniques: Cleaning all the way to the chamber and cleaning to the wad.
Cleaning all the way to the chamber: After shooting, come off the mat and retire to the cleaning/loading station. Do not remove the spent percussion cap. For a .45-caliber rifle, most shooters have used a .45-caliber plastic bristle brush and wrapped the moistened patch around it. (Plastic bristle brushes can be reversed, but bronze brushes of full diameter will lodge in the barrel when you try to pull them out.) Then give it three complete down-and-up strokes. Dry with a clean patch. To make sure the chamber is clear of debris fouling, step forward to the line and fire a percussion cap to clear the chamber. Return to the loading station, throw down a pre-measured powder charge, follow it with a .45-caliber .060-inch-thick card or felt wad and bullet.
When loading the bullet, don’t pound the ramrod on top of it like some sort of jack hammer! A simple firm pressure at the end of the stroke is sufficient. The bullet diameter with its lubrication should be able to slide down the barrel with a slight pressure on the ramrod.
Cleaning to the wad: After firing, leave the fired cap on the nipple. Retire to the loading station, throw down a charge of powder and chase it down with a .45-caliber card or felt wad. After that, clean down to the wad with the technique described above. A brush wrapped can be used with a patch or a jag and patch. If a jag is used, make sure it is one of the “ventilated” jags that allow air to come into the barrel. Otherwise, the jag will create suction that will upset the powder and wad. This method eliminates the need to “cap-off” to clear the chamber and saves time. As a final step, many shooters will lubricate the bore with a patch lightly dampened with Mobile 1 motor oil, which also makes it easier to clean the barrel.
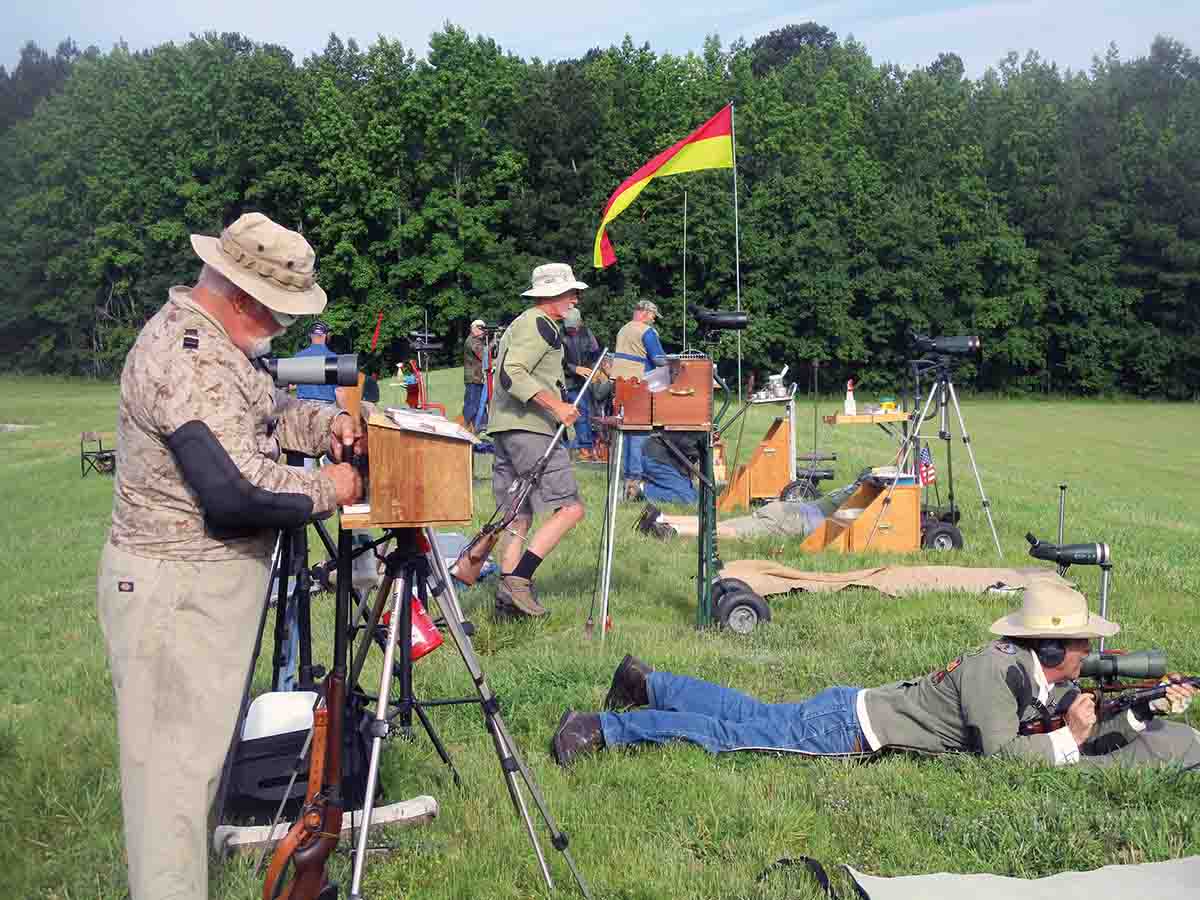
Setting up on Berms
Unlike silhouette competition, which is shot from a fixed line, shooters move to berms located at various distances from the targets, so a loading station needs to be set up on each berm. Try to have the same “floor” under the shooting mat to support your elbows to give you the same stable shooting position for each shot. As berms may be topped with gravel, sand, or grass, there may be small rises, depressions and soft spots under you. One way to avoid having one elbow sinking lower than the other is to place thin plywood squares, about 6 inches x 6 inches, under your mat that match your elbow positions on top of the mat. If you have short arms and need to keep your head up for proper shooting position, wrap phonebooks in duct tape to keep them firm, and place those under your elbows.
Many shooters employ two spotting scopes. One “up” scope is used at the loading station to spot the target markers and shot values. The other one next to your mat is used to check the mirage just before final sight adjustments are made. Ideally, this “down” scope will have an angled eyepiece enabling you to see through it without having to shift body position.
To help judge the wind, many shooters use a simple wind indicator (tell-tail) such as a ribbon or piece of yarn on a stout metal rod stuck into the ground. As part of advance preparation, if you have a tell-tail and an electronic wind speed indicator, take the tell-tail to an open field and note the digital readings as the tell-tail rises and falls with wind changes. When on the line in a match, you will know what the tell-tail is indicating because electronic wind reading devices cannot be used in a match.
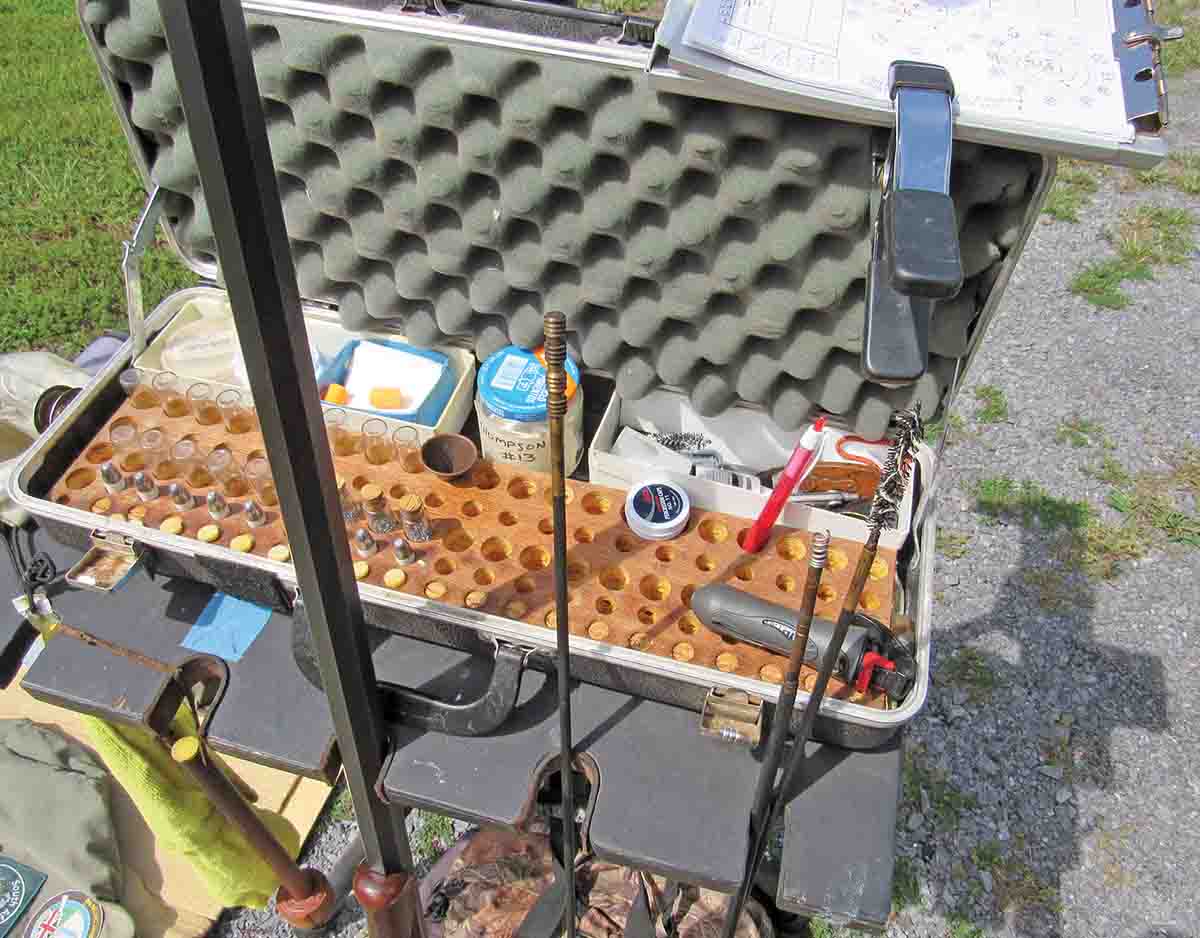
The loading station: The key to the loading station is that it must be mobile, or easy to set up and take down when moving from one berm to another. Remember, you have to get all of this stuff into your car or truck.
There are as many different loading stations as there are shooters. Some are simple tripods with a loading shelf, and some are masterpieces of furniture utilizing bicycle wheels. But, all shooters must be able to have space for the items they will need to clean and load their rifle. These items may include:
• An “up” scope, if desired, to spot hits and check for wind changes.
• Wet and dry patches.
• Separate cleaning and loading rods.
• A loading block with bullets and corresponding pre-measured powder charges. Arrange the bullets and powder charges in such a way that you can keep track of your shots and charges.
• Percussion caps (you may prefer to have a capper on your mat).
• Provision to attach a small bag for dirty patches.
• A timer.
• Notches in the shelf for leaning your rifle and rods.
Be sure to keep your shooting box near your shooting position for any unforeseen needs.
Other items:
• Shooting jacket. This can be canvas or leather. Leather jackets will offer the greatest stability, but they are hot. As a result, leather jackets are seldom seen. Most shooters will use a lightweight canvas jacket. If planning to shoot international competition with the U.S. International Muzzle Loading Team, the international rules are basically this: modern-style coats are allowed, and there are no rules about button-up versus adjustable straps and no sling hook can be used on the jacket to connect the sling. On the other hand, our NRA does have some coat regulations in the target rifle events that muzzleloaders can be used in. Check the rules before you buy or use a jacket.
• Shooting glove.
• A small foldable stool or beach chair. You will have to keep score or work the pits for other relays. If you are a scorekeeper, you will need to use one when scoring. You should also have a tripod for your scope to spot hits. Bring a pen and a clipboard.
• A wrist rest. Use at 900 and 1,000 yards. This can be anything from an adjustable support to a block of wood or in one case, which was seen at a match, a collapsible car jack!
• Rifle sling (see below).
• Recoil shield/shoulder pad.
Slings and Shooting Technique
The only difference between silhouette matches and shooting long range is the use of a sling. The Muzzle Loading Association International Confederation rules, section 4.9 concerning slings states:
Slings shall be original or a reproduction of a contemporary type. Modern adjustable target type slings, including single-point slings, are forbidden. The sling shall not be fixed to the rifle in such a way so as to give support to the shooter similar to that given by a single point sling. The following shall be permitted provided that the separation between the two ends is not less than eight inches (203mm) apart: barrel to trigger guard; fore end of stock to trigger guard; barrel to rear of stock.
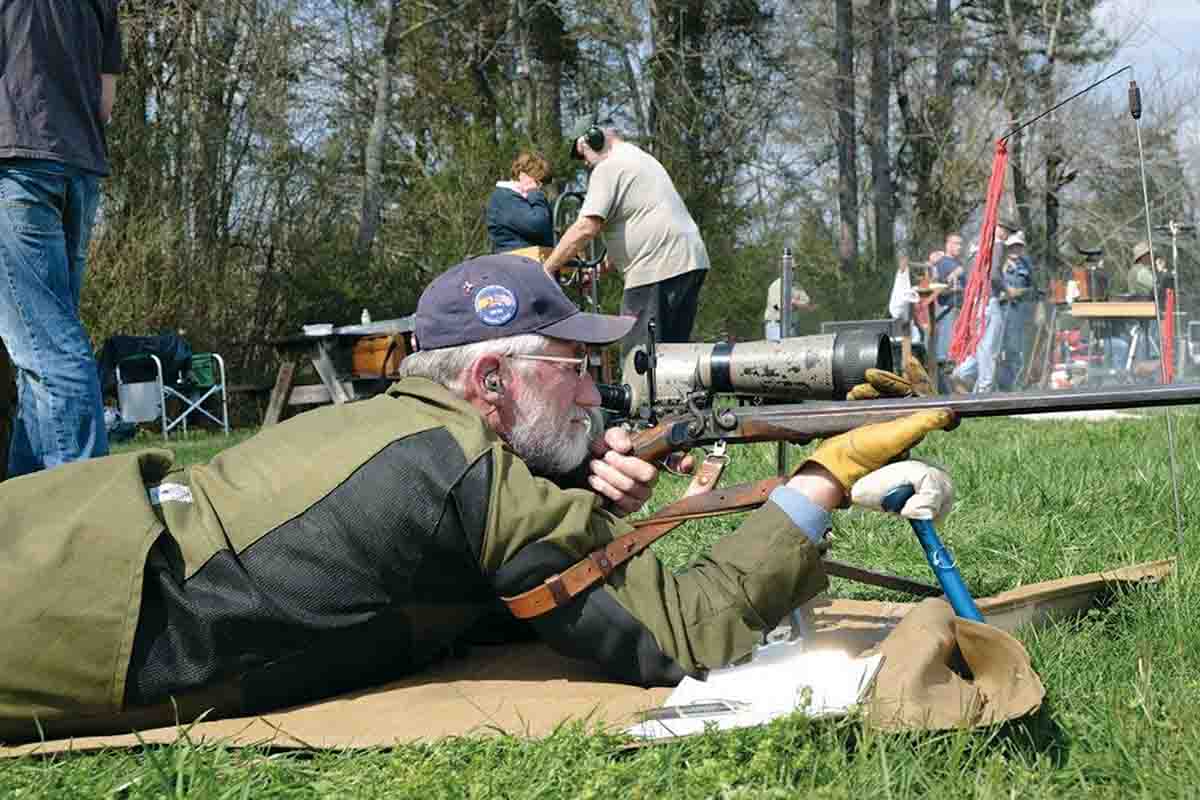
There are numerous Internet articles on shooting prone and prone with a sling, so they won’t be covered here. Dave Gullo has suggested shooting from your natural point of aim, lining up the sights on the bulls-eye. Avoid using muscle tension to force the gun into position and if needed, adjust your position to put yourself on target by moving your hips. Dave prefers being at only a slight angle, not direct, so that the line of the rifle is in line with his right leg and pointed at the inside of his right ankle. It should be comfortable and fairly straight on. Test yourself by closing your eyes for a few seconds. When you open them, you should still be on target. Gullo added, “In my mind I pretend my left arm is a bench rest. Focus on the front sight and break the shot between heartbeats.”
Lee Shaver advises, to begin practicing with a sling, shoot without one! That will force you to focus on proper alignment. He also places great emphasis in setting up in the exact same manner each time you get to the mat, with special attention to placement of the butt of the rifle on the shoulder. Allowing the butt to shift, even slightly will have a great effect on bullet placement.
Use of a Sling and a Wrist Rest: At 900 and 1,000 yards, shooters are allowed, but not required, to a use wrist rest with or without a sling. Shaver has noted that most people lean on the rest too heavily and it changes the harmonics of the gun and the way it recoils. To test if a shooter is using it correctly, shoot a group with sling only, then shoot with sling and rest. If the group moves, the shooter is probably leaning on it too hard. Use the rest in the sling position not to hold the weight of the gun, but to take the wiggles out.
Ed Decker differs a bit, “I can actually shoot better with a sling than a rest. It’s always the same, no matter what the berm is like. If I do use a rest, I like a small adjustable-height rest rather than fixed points.”
Wind Doping
This may well be the most difficult aspect of long range shooting, and the most daunting to the novice. While there are many videos and articles on the Internet to show you, the only way to learn is to do it.
Lee Shaver offered an interesting insight, “One way to get an idea of what wind does when it passes over terrain, is to go to a shallow brook with stones and rocks. Notice how the water swirls and eddies around the rocks. This is similar to what wind does. Instead of rocks, you have trees, berms, and depressions.”
Gullo states it very simply, “Look at the trees, flags and mirage, make an estimate, adjust your sights and pull the damn trigger. When you’re in a match, look at mirage and look at flags. You have got to learn to read the conditions – turn the knobs and shoot. One of the things that happens is that conditions will repeat themselves. Remember them and your sight settings. You may only be able to remember two or three conditions and settings, but that will usually suffice.”
Bullet Drift
Most firearms made in the United States employ rifling with a right-hand twist, which imparts the rotation, making the bullet more stable in flight. The rotation also causes the bullet to move to the right. While this bullet drift is negligible at short range, it can be as much as 2½ to 3 minutes at 900 and 1,000 yards. That’s equivalent to 25 to 30 inches! A sight correction should be factored in when shooting at these distances. This is relatively easy to do with a windage-adjustable front sight as it avoids having to do the math every time you correct for a wind shift or gust.
Assessing Your Rifle’s Accuracy
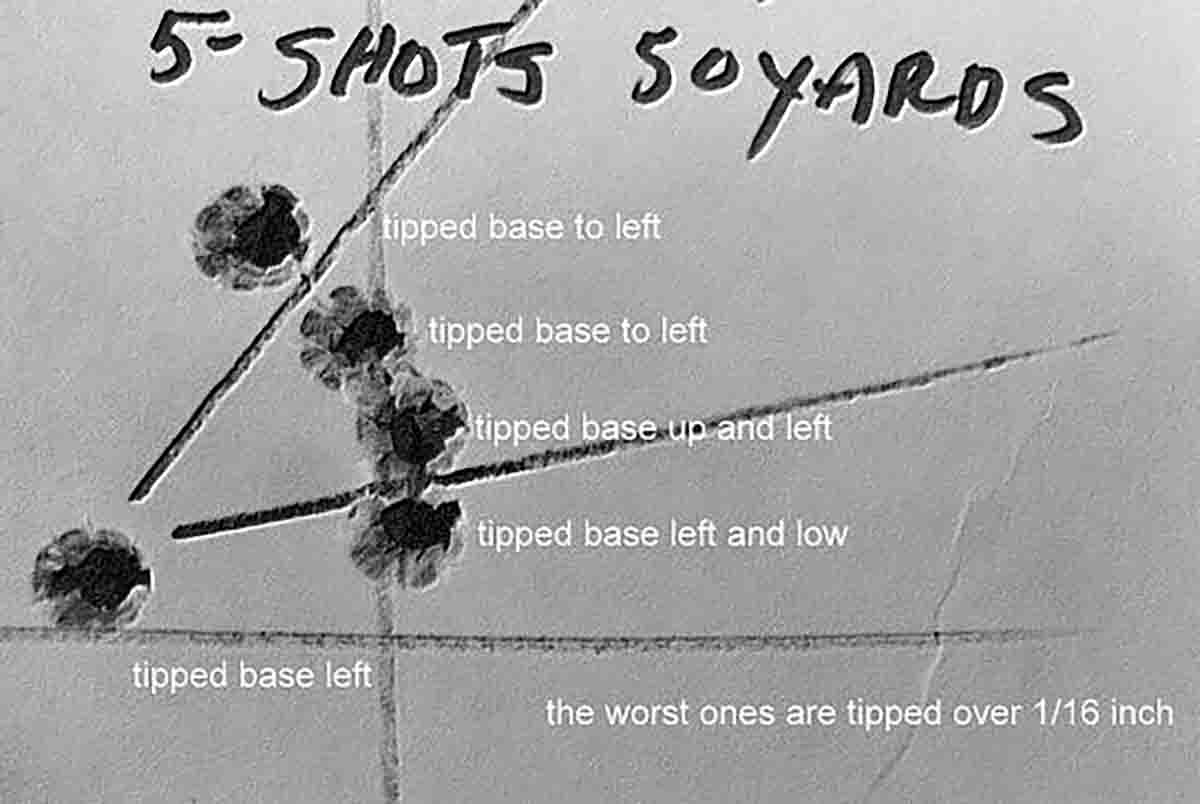
Lee Shaver has said that there are hundreds of reasons why a bullet lands where it does, but essentially there are three. The first is bullet balance, the second is where the barrel is pointed, and the third is external forces when the bullet leaves the barrel. When trying to figure out the accuracy potential of a rifle, determine which category the problems lie in. To do that, eliminate the third category by not shooting at long distance; instead shoot at 50 yards.
Lee has also shared these thoughts concerning accuracy:
“I take look at the bullet holes to see of the bullet is out of balance. If it is, it will always show a hole with markings that are oblong rather than circular, indicating a tipped bullet. If it does, it says the accuracy problem is inside the barrel. If the holes all look perfect, and the nose punch is centered in the target in relation to the bullet body markings on the target, then we know the problem is outside of the barrel.
There are many reasons why bullets are tipped. For example, casting problems can leave voids in a bullet, there can be a poor fit (too small diameter), etc. We had a problem with a gun that had a slight bulge in the barrel. The bullets were damaged every time they entered the bulge and allowed the hot gasses to pass around them.
Every wobbly bullet hole (at short range) indicates a bullet that is out of balance. This is not true at longer distances because other factors can cause a bullet to show a wobbly (tipped) hole at longer distances. Things like stability and side winds for instance.
What is most important to remember is that a bullet wobbles at short range because the center of gravity is not in the center of the bullet. For instance, if a bullet’s center of gravity is off center by only .001 inch on a .45-caliber, 500+ grain bullet, that bullet will shoot no better than four-MOA groups.
When a bullet wobbles that means the bullet is crooked at one moment and not the next. The absolute best way to test for wobbly bullets is to set two targets up with one behind the other at a distance of only 15 to 20 feet from the rifle. The targets should be spaced out by half the twist rate of the barrel, and set up so you shoot through both at one time. That way if the bullet is not tipped at one target it will be the next, it is truly a wobbly bullet.
The bottom line: if your bullets are tipping, you must investigate the cause, of which there can be many, and solve it or else the rifle will never have the accuracy to be competitive in long range.”
Practice: Practice does not make perfect. Perfect practice makes perfect. Shooting, all shooting, is a discipline. Every time the trigger is pulled, you are teaching your brain something. So, take the time and maintain the mental focus on what you are doing when you practice.
Few of us have access to a 1,000-yard range. But you can actually practice effectively with a .22 Long Rifle. As Shaver notes, “The performance of a .22 at 300 yards is almost identical to a long range muzzleloader with a .45, 540-grain bullet at 1,000 yards. Moreover, you can easily spend time practicing your technique by dry firing. You might include getting up and down after each shot to simulate what you’ll actually be doing on the range.”
Decker advises, “Lee Shaver taught me that I could learn more by shooting behind my shop at 30 yards than I could ever learn on the range at 200 or 300 yards. It’s amazing – work out all the bugs at short range, then go to the range and learn to read the wind.”
Want more information or to come to a match?
The Team Captain of the US International Muzzle Loading Team (USIMLT) is Ed Decker. He can be contacted at onceuponatimetwo@gmail.com or call 865-256-7262. The US organization is an affiliate of the Muzzle Loaders Associations International Confederation (MLAIC). The MLAIC grew out of a number of British and European shooting clubs that specialized in shooting original and reproduction muzzleloading arms. This year, the US team will be at the 11th MLAIC World Long Range Championships in Adelaide, South Australia.
Come to the Super Shoot!
The Trifecta of American Black Powder is coming! Bring your muzzleloader and your cartridge rifle. The National Muzzle Loading Rifle Association Western Spring Nationals are scheduled February 28 through March 4 2018, located near Phoenix, Arizona at the Ben Avery Range. The next day the USIMLT match will be held at the same location, March 5 through March 7 and the World 1,000-Yard Championships from March 8 through March 10. That’s eleven continuous days of black powder shooting that will bring together shooters from all over the world.
The USIMLT segment of the Super Shoot will include matches at 300, 500, 600, 900 and 1,000 yards for all competitors. The matches will include muzzleloaders, cartridge rifles and vintage sniper rifles, all shooting at the same time, but at targets and under rules appropriate for each subgroup of rifles. Each subgroup will have its own awards. Our third day, March 7, will be a fun day dividing up shooters of different types of rifles into teams for a match at 1,000 yards.
Come and participate in this rare opportunity for all black powder riflemen.